In this tutorial, we will learn how to traverse and modify the DOM using JS and some examples of their output.
Manipulating the DOM(Document Object Model) is one of the core aspects of web development. It’s an easy and efficient way that allows us to update the content whenever we want and how many times we want there is no limit to updating the content as it is dynamic we can also update the webpage structure as per our wish.
In this article, we will explore and learn how to traverse also known as navigate the DOM and modify its elements using JS.
What is DOM Traversing?
DOM traversing refers to navigating between parent, child, and sibling elements within an HTML document.
Steps to Traverse and Modify the DOM
Step 1: Access the DOM Elements
First, select the element you want to modify using methods like:
getElementById(for unique elements)getElementsByClassName(for multiple elements with the same class)querySelector(for a more flexible selection)
Step 2:Traverse the DOM
You can navigate the parent-child relationship using:
.parentNode→ Access the parent element.childNodes→ Get all child nodes.firstChild/.lastChild→ Get the first or last child
Step 3: Modify the DOM
After accessing an element, you can modify:
- Text content →
.innerHTMLor.textContent - CSS styling →
.style - Attributes →
.setAttribute(),.removeAttribute()
Example: Traversing and modifying the DOM
Here’s a sample JavaScript example demonstrating how to traverse and modify the DOM dynamically:
<!DOCTYPE html>
<html lang="en">
<head>
    <meta charset="UTF-8">
    <meta name="viewport" content="width=device-width, initial-scale=1.0">
    <title>Traverse and Modify DOM</title>
</head>
<body>
    <div id="parent">
        <p class="child">This is a paragraph.</p>
        <p class="child">This is another paragraph.</p>
    </div>
    <button id="modifyButton">Modify DOM</button>

    <script>
        // Access the parent element
        const parentDiv = document.getElementById("parent");

        // Get child elements by class name
        const paragraphs = parentDiv.getElementsByClassName("child");

        // Add event listener to the button
        document.getElementById("modifyButton").addEventListener("click", () => {
            for (let i = 0; i < paragraphs.length; i++) {
                paragraphs[i].innerHTML = `Modified Paragraph ${i + 1}`;
                paragraphs[i].style.color = "blue";
            }
        });
    </script>
</body>
</html
Code Explanation
- Access the Parent Element
ThegetElementByIdmethod is used to access the<div>with theidofparent. - Traverse the Child Elements
ThegetElementsByClassNamemethod fetches all the<p>elements with the classchild. - Modify the Content and Style
Aclickevent listener is added to the button. When the button is clicked:- The content of each paragraph is changed to
Modified Paragraph X(where X is the index + 1). - The text colour of each paragraph is updated to blue using the
style.colorproperty.
- The content of each paragraph is changed to
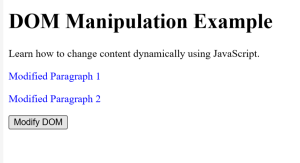
Output:
So, the initial out is
This is a paragraph.
This is another paragraph.

After clicking the button the output is
Modified Paragraph 1
Modified Paragraph 2.
(with blue colour text).
I hope this article will help you learn and understand How to Traverse and Modify the DOM Using JavaScript.
Thank you.