In this tutorial, we are going to learn the Decision Tree Classifier in Python.
What is the Decision Tree Classifier in Python?
A Decision Tree is a supervised learning model that can be applied in classification and regression tasks. It represents decisions and possible consequences in a simple tree structure to read and understand.

In the context of classification, it works by recursively splitting the dataset based on feature values to create a tree-like structure where :
- Root node represents the entire dataset.
- Internal nodes represent decision points based on feature values.
- Branches represent outcomes of decisions (e.g., Yes/No, True/False).
- Leaf nodes represent final class labels (predictions).
Types of Decision Tree
- Classification tree: They are designed to predict categorical outcomes means they classify data into different classes.
- Regression tree: These are used when the target variable is continuous It predicts numerical values rather than categories.
Implementation of Decision Tree Classifier
Step 1: Import Required Libraries
First, we need to import the required Python libraries. We will be using Pand, Matplotlib, and Scikit-Learn.
import pandas as pd
import matplotlib.pyplot as plt
import seaborn as sns
from sklearn.model_selection import train_test_split
from sklearn.tree import DecisionTreeClassifier
from sklearn.metrics import accuracy_score, classification_report ,confusion_matrix
Step 2: Load the Dataset
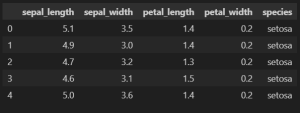
We will use the Iris dataset for this Tutorial. This dataset contains 150 samples of iris flowers.
It has four features :
- Sepal length
- Sepal width
- Petal length
- Petal width
And target is species: setosa, versicolor, and virginica
df = sns.load_dataset('iris')
df.head()
Output :
Step 3: Split the Dataset
Next, we will split the dataset into Features and Targets.
X = df.iloc[:, :-1]
y = df.iloc[:, -1]
X,y
Now, we will split these Features and targets into train and test sets.
X_train, X_test, y_train, y_test = train_test_split(X, y, test_size=0.2, random_state=42)
Step 4: Train the Decision Tree Classifier Model
Now, we’ll create an instance of the DecisionTreeClassifier() model and fit it into our training data
model = DecisionTreeClassifier()
model.fit(X_train, y_train)
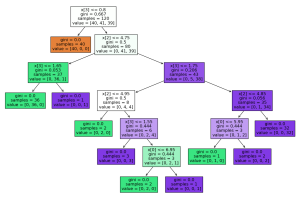
Step 5: Visualize the Decision Tree Classifier
This visualization helps us understand how the model makes classification decisions.
from sklearn import tree
plt.figure(figsize=(15,10))
tree.plot_tree(model,filled=True)
Output:
Step 6: Make Prediction
Now our model is trained and we can predict y value for our test set.
y_pred = model.predict(X_test)
y_pred
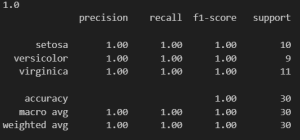
Step 7: Evaluate the Model
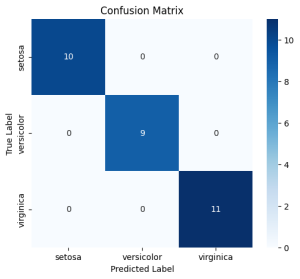
Now we have to check how precisely our model is working. The accuracy score tells us how well the model performed, and the classification report provides precision, recall, and F1-score for each class. Additionally, we visualize the confusion matrix, which shows the number of correct and incorrect predictions for each class.
score = accuracy_score(y_test, y_pred)
print(score)
print(classification_report(y_test, y_pred))
Output :
conf_matrix = confusion_matrix(y_test, y_pred)
plt.figure(figsize=(6,5))
sns.heatmap(conf_matrix, annot=True, cmap="Blues", fmt="d", xticklabels=df['species'].unique(), yticklabels=df['species'].unique())
plt.xlabel("Predicted Label")
plt.ylabel("True Label")
plt.title("Confusion Matrix")
plt.show()
Output :
Conclusion
In this blog, we implemented a Classification Decision Tree using Python and applied it to the Iris dataset.