Audio is a widespread form of media on the web, commonly in the MP3 file format. In this tutorial, we’ll learn how to build a GUI application in Python which can trim/cut any user input portion of an MP3 audio file. To build such an application, we’ll use the following packages:
- ‘pydub‘ package in Python
- ‘tkinter‘ package in Python
- ‘ffmpeg‘ package in Homebrew
Build a MP3 cutter/trimmer application using Python and Tkinter
Each of the above packages serve a different purpose: pydub is useful in manipulating audio files within the Python framework; tkinter allows us to build the GUI for our project; ffmpeg is an open-source command-line tool that is used to process audio and video files.
The first step is to install the required packages for this application. To install pydub, type the following command into your terminal:
pip install pydub
To install ffmpeg, follow the instructions on this link.
After these packages are installed, we can begin writing code to build the application. The code can be divided into two sequential steps:
- creating and adding features to the GUI window, and
- defining a trim function to cut a user input portion of the chosen MP3 audio file
Let’s first understand how to build the our GUI’s main window.
The first step is to import all the required packages, and any additional modules if needed. From the pydub package, we require the AudioSegment module to load and operate on audio files, as well as save new ones. The filedialog module in Tkinter provides a way to create file dialogs, which are windows that allow the user to select files or directories in the GUI.
Next, we create the main window of the application and sets its title to “MP3 Trimmer App”.
import tkinter as tk
from tkinter import filedialog
from pydub import AudioSegment

main_window = tk.Tk()
main_window.title("MP3 Trimmer App")
After this, we create multiple labels and buttons for the user to read and use:
- First: a label and a button are created for selecting an MP3 file. Observe that this button has a command specified in its argument to open a file dialogue when it’s clicked. Both the label and button are then packed into the main window.
- Second: a label and spinbox widget, with a 0-100 selection range, are created for the user to enter the start time for trimming.
- Third: another label and spinbox widget are created. This time, it’s for the user to enter the desired end time for trimming.
- Fourth: a button named “Trim MP3” is created which, when clicked, calls the trim_mp3() function.
-
Finally, one more label is created to display the status of the trimming operation to the user. This label is initially empty. We then pack this into the main window of the GUI.
import tkinter as tk
from tkinter import filedialog
from pydub import AudioSegment

main_window = tk.Tk()
main_window.title("MP3 Trimmer App")

file_label = tk.Label(main_window, text = "Select MP3 file:")
file_label.pack()
file_button = tk.Button(main_window, text = "Browse", command = lambda: filedialog.askopenfilename())
file_button.pack()

start_label = tk.Label(main_window, text = "Start time (seconds):")
start_label.pack()
start_spinbox = tk.Spinbox(main_window, from_ = 0, to = 100, width = 5)
start_spinbox.pack()

end_label = tk.Label(main_window, text = "End time (seconds):")
end_label.pack()
end_spinbox = tk.Spinbox(main_window, from_ = 0, to = 100, width = 5)
end_spinbox.pack()

trim_button = tk.Button(main_window, text = "Trim MP3", command = lambda: trim_mp3())
trim_button.pack()

status_label = tk.Label(main_window, text = "")
status_label.pack()
We have now completed building the GUI for our project. Next, we’ve to describe the function that will trim the MP3 file and create a new one.
The algorithm to create such a function is multi-step:
- open a file dialog to select an MP3 file,
- get the start and end times from the spinbox widgets using get(),
- load the MP3 file using pydub and trim the audio using slicing,
- save the trimmed audio to a new file using export(), and
- finally, update the status label to display “MP3 trimmed successfully!”
def trim_mp3():
    file_path = filedialog.askopenfilename()

    start_time = int(start_spinbox.get())
    end_time = int(end_spinbox.get())

    audio = AudioSegment.from_mp3(file_path)

    trimmed_audio = audio[start_time * 1000: end_time * 1000]

    trimmed_file_path = file_path.replace(".mp3", "_trimmed.mp3")
    trimmed_audio.export(trimmed_file_path, format = "mp3")

    status_label.config(text = "MP3 trimmed successfully!")
This completes the trim_mp3() function. The last step in building the trimmer application is to start the main event loop using mainloop(). This function runs the GUI application until it is closed by the user.
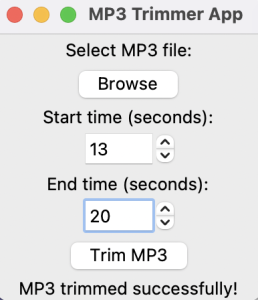
You can observe how the full code and GUI works below.
import tkinter as tk
from tkinter import filedialog
from pydub import AudioSegment

main_window = tk.Tk()
main_window.title("MP3 Trimmer App")

file_label = tk.Label(main_window, text = "Select MP3 file:")
file_label.pack()
file_button = tk.Button(main_window, text = "Browse", command = lambda: filedialog.askopenfilename())
file_button.pack()

start_label = tk.Label(main_window, text = "Start time (seconds):")
start_label.pack()
start_spinbox = tk.Spinbox(main_window, from_ = 0, to = 100, width = 5)
start_spinbox.pack()

end_label = tk.Label(main_window, text = "End time (seconds):")
end_label.pack()
end_spinbox = tk.Spinbox(main_window, from_ = 0, to = 100, width = 5)
end_spinbox.pack()

trim_button = tk.Button(main_window, text = "Trim MP3", command = lambda: trim_mp3())
trim_button.pack()

status_label = tk.Label(main_window, text = "")
status_label.pack()

def trim_mp3():
    file_path = filedialog.askopenfilename()

    start_time = int(start_spinbox.get())
    end_time = int(end_spinbox.get())

    audio = AudioSegment.from_mp3(file_path)

    trimmed_audio = audio[start_time * 1000: end_time * 1000]

    trimmed_file_path = file_path.replace(".mp3", "_trimmed.mp3")
    trimmed_audio.export(trimmed_file_path, format = "mp3")

    status_label.config(text = "MP3 trimmed successfully!")

main_window.mainloop()
Output:

With this code, you can trim any MP3 file to obtain the audio section that you desire. Try it out with your favorite song or podcast!
Thank you for reading this tutorial.