Hello everyone, today in this tutorial you will learn how to play audio on a webpage by using JavaScript
You will also learn how to play audio, pause the audio, stop it, and play it from the start.
Steps to create the main webpage
The following steps to play audio using JavaScript are –
- In the first step download audio from the internet and move it to the folder where the code is stored.
- In the next step, change the audio file name to audio.mp3.
- In the next step create an HTML file named audio.html.
- In the next step create the boilerplate in the HTML file
- Now create a heading tag by inserting the information i.e. Playing audio using JavaScript.
<!DOCTYPE html>
<html lang="en">
<head>
    <meta charset="UTF-8">
    <meta name="viewport" content="width=device-width, initial-scale=1.0">
    <title>Play an audio on the webpage</title>
</head>
<body>
    <h1 id = "heading1">Playing audio using JavaScript</h1>
</body>
</html>
Rename the sentence inside the title with Play audio on the webpage
- In the next step create a CSS file named aucs.css and link it with the following code line
<link rel = "stylesheet" href = "aucs.css">
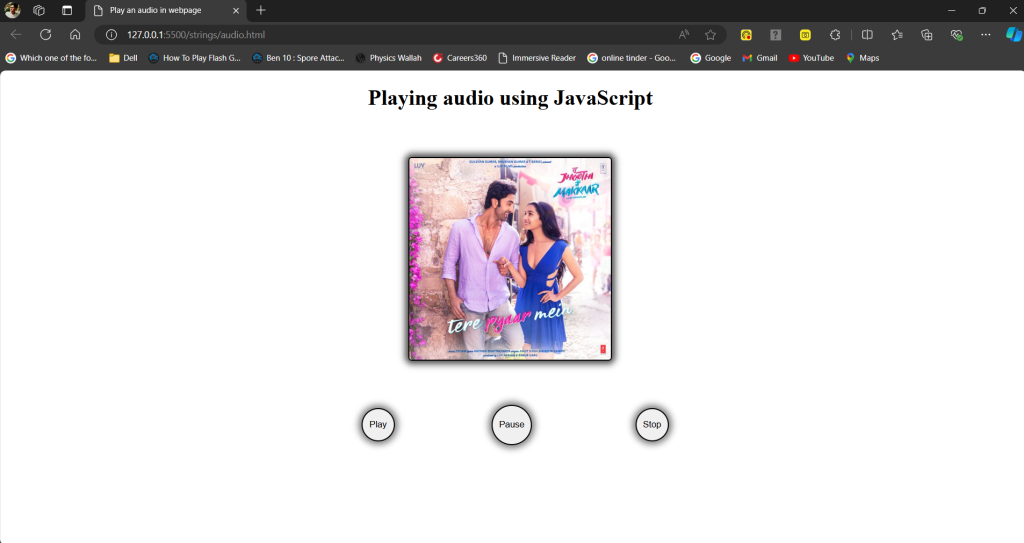
- In the next step search an image and copy its image address.
- In the next step create a div and add it to the class category named box1.
- Now in the div tag paste the image address from the internet by using the IMG tag.
- Add the image tag into the category of ID named firstimg.
<!DOCTYPE html> <html lang="en"> <head> <meta charset="UTF-8"> <meta name="viewport" content="width=device-width, initial-scale=1.0"> <title>Play an audio in webpage</title> <link rel = "stylesheet" href = "aucs.css"> </head> <body> <h1 id = "heading1">Playing audio using JavaScript</h1> <div class = "box1"> <img id = "firstimg" src = "https://c.saavncdn.com/367/Tere-Pyaar-Mein-From-Tu-Jhoothi-Main-Makkaar-Hindi-2023-20230203140532-500x500.jpg"> </div> </body> </html> - In the next step create 3 buttons by using the button tag <button></button>.
- In the next step add all the buttons into the category of ID.
- In the next step name the 1st button as Play, 2nd button as Pause, and 3rd button as Stop.
<!DOCTYPE html> <html lang="en"> <head> <meta charset="UTF-8"> <meta name="viewport" content="width=device-width, initial-scale=1.0"> <title>Play an audio in webpage</title> <link rel = "stylesheet" href = "aucs.css"> </head> <body> <h1 id = "heading1">Playing audio using JavaScript</h1> <div class = "box1"> <img id = "firstimg" src = "https://c.saavncdn.com/367/Tere-Pyaar-Mein-From-Tu-Jhoothi-Main-Makkaar-Hindi-2023-20230203140532-500x500.jpg"> </div> <button id = "play">Play</button> <button id = "pause">Pause</button> <button id = "stop">Stop</button> </body> </html> - In the next step create a JavaScript file named paudio.js and link it with the HTML file using the following code.
<script src = "paudio.js"></script>

The HTML file - Now in the CSS file start the editing and make the necessary changes to make the webpage perfectly user-interactive.
- Start editing all the tags created in the HTML file by accessing their category i.e. by accessing their class and ID.
#heading1{
    margin-left: 540px;
}

.box1{
    height: 300px;
    width: 300px;
    border-color: black;
    border-width: 2px;
    border-style: solid;
    margin-left: 600px;
    margin-top: 70px;
    border-radius: 5px;
    box-shadow: 0px 0px 10px 5px rgb(74, 74, 74);
}

#stop{
    margin-top: 70px;
    margin-left: 150px;
    height: 50px;
    width: 50px;
    border-color: black;
    border-style: solid;
    border-radius: 50px;
    box-shadow: 0px 0px 10px 5px grey;
}

#stop:hover{
    cursor: pointer;
    transition-duration: 0.5s;
    transform: scale(1.05);
    background-color: rgb(101, 99, 99);
    font-weight: bold;
}

#pause{
    margin-left: 140px;
    height: 60px;
    width: 60px;
    border-color: black;
    border-style: solid;
    border-radius: 50px;
    box-shadow: 0px 0px 10px 5px grey;
}

#pause:hover{
    cursor: pointer;
    transition-duration: 0.5s;
    transform: scale(1.05);
    background-color: rgb(101, 99, 99);
    font-weight: bold;
}

#play{
    margin-left: 530px;
    height: 50px;
    width: 50px;
    border-color: black;
    border-style: solid;
    border-radius: 50px;
    box-shadow: 0px 0px 10px 5px grey;
}

#play:hover{
    cursor: pointer;
    transition-duration: 0.5s;
    transform: scale(1.05);
    background-color: rgb(101, 99, 99);
    font-weight: bold;
}

#firstimg{
    height: 300px;
    width: 300px;
    border-radius: 5px;
}
The CSS File
Now implement both the HTML file and the CSS file to construct the basic layout of the webpage
Steps to create the JavaScript to play audio
- In the first step declare or introduce the audio in the JavaScript file.
- In the next step create a variable named audio which creates an object in the variable named Audio.
- You can create the variable by using the keyword [ let ].
- This object represents the audio element that is provided by the browser to play audio by passing its file path or its URL.
let audio = new Audio("audio.mp3");Note – You must add the audio file in the folder where the code is stored.
- In the next step use the DOM method i.e. document object model to access all the HTML tags in the JavaScript file.
- In the HTML file access all the button tags with their ID by using the document.getElementbyId code line.
- Now access the HTML tags in the JavaScript file by using a variable named play, pause, and stop.
let play = document.getElementById("play"); let pause = document.getElementById("pause"); let stop = document.getElementById("stop"); - Now in the next step create a function named playMusic.
- Now in the function declare the variable audio and pass a method .play() which will be audio.play().
- The .play() method calls the object i.e. Audio in which the audio file path or URL is stored to play it.
- Follow the above steps to create the function named pauseMusic to pause the audio by adding the method .pause().
function playMusic() { audio.play(); } function pauseMusic() { audio.pause(); } - In the next step create a function named stopMusic which will pause the audio and play the audio again from the beginning.
- In this current function pass 2 method audio.pause() will pause the audio and audio.currentTime=0 plays the audio from the beginning.
function stopMusic() {
    audio.pause();
    audio.currentTime = 0; // It set the audio timer to zero
}
Note – audio,currentTime=0 will set the audio timer again to zero.
- In the next use addEventListener a JavaScript method and add it to variables play, pause, and Stop.
- The above method calls the functions to perform specific tasks assigned to each function.
play.addEventListener("click", playMusic);
pause.addEventListener("click", pauseMusic);
stop.addEventListener("click", stopMusic);
Final Output
The link to the final output -> Final Ouput