In this tutorial , we can create a simple image resizing tool using HTML , CSS & JavaScript in a simple way.
Image resizing tool allows users to upload an image, specify new dimensions, and preview the resized image directly in the browser.
Steps for creating a simple image resizing tool:
1.HTML:
HTML is the standard language used to create and structure content on the web. It provides the basic building blocks for web pages, defining elements such as headings, paragraphs, links, images, and etc..
<!DOCTYPE html>
<html lang="en">
<head>
    <meta charset="UTF-8">
    <meta name="viewport" content="width=device-width, initial-scale=1.0">
    <meta http-equiv="X-UA-Compatible" content="ie=edge">
    <link rel="stylesheet" href="style.css">
    <title>Image Resizer</title>
</head>
<body>
    <div class="inputs">
        <h2>Resize your Image</h2>
        <form>

            <label for="file" class="upload">Select the Image</label>
            <input type="file" id="file" accept="image/*" onchange="loadImage(event)">
            <label >Width</label>
            <input type="number" id="Width" placeholder="Enter width in px">
            <label >Height</label>
            <input type="number" id="Height" placeholder="Enter height in px">


        </form>

        <button type="submit" id="preview">Preview</button>
    </div>
    <div class="output">
        <canvas id="result">
            <img src="" id="Displayimg" alt="">
        </canvas>


    </div>
    <script src="script.js"></script>
</body>
</html>
2.CSS:
Cascading Style Sheets is a stylesheet language used to describe the presentation of a document written in HTML. It controls the layout, colors, fonts, and overall visual styling of a web page.
html, body{
    font-family: Arial, Helvetica, sans-serif;
    margin-left: 5%;
    padding: 0;

}
h2{
    color: #0c89e2;
}

.inputs, .output {
    width: 40%;
    height: auto;
    float: left;
    margin: 1em;

}
.output{
    text-align:center;
}
input {
    display: table;
    margin-bottom: 1em;
    width: 60%;
    font-size: 16px;
    border: 2px solid #0c89e2;
    border-radius: 5px;
    padding: 10px;

}
#file {
    width: 0.1px;
    height: 0.1px;
    opacity: 0;
}
.upload, button {
    color: #fff;
    background-color: #0c89e2;
    padding: 10px;
    border: 2px solid #0c89e2;
    border-radius: 5px;
    font-size: 20px;
    cursor: pointer;
}
3.JavaScript:
JavaScript is a high-level, interpreted programming language that enables interactive and dynamic content on web pages.
const canvas = document.getElementById("result");
const ctx = canvas.getContext("2d");

function loadImage(event) {
  const image = document.getElementById("Displayimg");
  image.src = URL.createObjectURL(event.target.files[0]);
}

const preview = document.getElementById("preview");
preview.addEventListener("click", prev);

function prev() {
  const image = document.getElementById("Displayimg");

  const Width = document.getElementById("Width").value;
  const Height = document.getElementById("Height").value;

  canvas.width = Width;
  canvas.height = Height;

  ctx.drawImage(image, 0, 0, Width, Height);

  form = document.querySelector("form");
  form.reset();
}
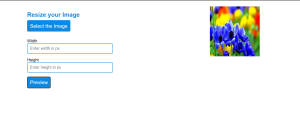
Output:
 This tutorial provides the simple way of creating the image resizing tool.
HOPE YOU LIKED THIS TUTORIAL!