Hello everyone, in this tutorial you will learn how to generate a website URL of any company by taking its name as input
Steps to create the website
- In the first step create the frontend part i.e. website using HTML and CSS
- In the second step create the backend part and store the data
- In the third step connect both the frontend and backend parts
Steps to create the main webpage
Follow the below steps to create the main webpage
- In the first step create a folder in your system named BACKEND
- In the next step create an HTML file named form.html in which you will generate the skeleton of the webpage
- In the next step, generate the boilerplate
<!DOCTYPE html>
<html lang="en">
<head>
  <meta charset="UTF-8">
  <meta name="viewport" content="width=device-width, initial-scale=1.0">
  <title>GoToCompany</title>
</head>
<body>

</body>
</html>
Change the title of the webpage from Document to GoToCompany
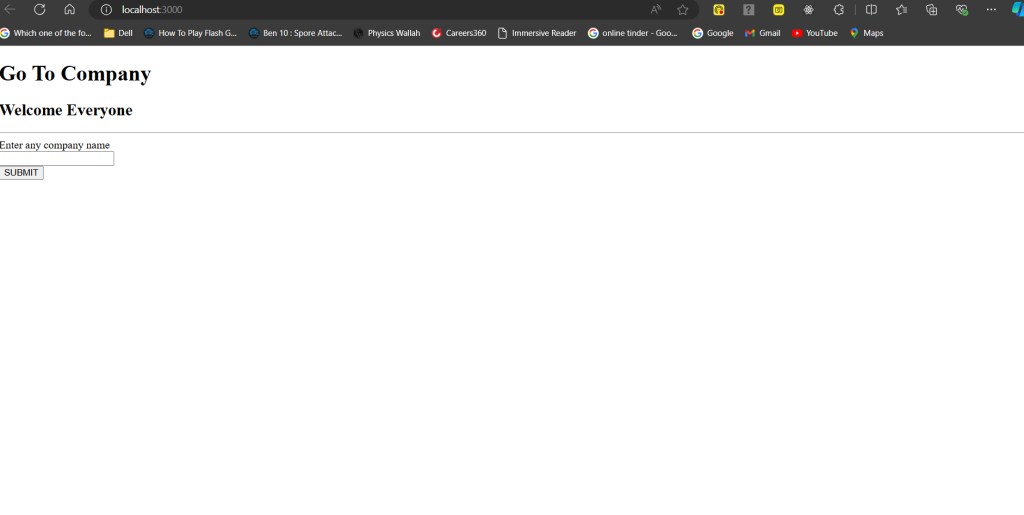
- Now in the next step, create the main heading and the sub-heading
<!DOCTYPE html>
<html lang="en">
<head>
  <meta charset="UTF-8">
  <meta name="viewport" content="width=device-width, initial-scale=1.0">
  <title>Document</title>
</head>
<body>
  <div>
    <h1 class = "headingone">Go To Company</h1>
  </div>
  <div>
    <h2 class = "headingtwo">
      Welcome Everyone
    </h2>
    <hr class = "borderline">
</body>
</html>
Additionally, assign classes to each heading i.e. <h1> and <h2> in order to provide CSS styling
- Now in the next step create a form tag which creates an input field and a submit button to take input and submit the data
<!DOCTYPE html>
<html lang="en">
<head>
  <meta charset="UTF-8">
  <meta name="viewport" content="width=device-width, initial-scale=1.0">
  <title>Document</title>
</head>
<body>
  <div>
    <h1 class = "headingone">Go To Company</h1>
  </div>
  <div>
    <h2 class = "headingtwo">
      Welcome Everyone
    </h2>
    <hr class = "borderline">
  </div>
  <div class = "formbox">
    <form action="/submit" method="POST">
      <label for = "street" class = "companyname">Enter any company name</label></br>
      <input type ="text" name = "companyname" required class = "inputform"> </br>
      <input type="submit" value="SUBMIT" class = "buttonstyle">
    </form>
  </div>
</body>
</html>
You can add classes to the form tag by keeping it inside a div tag, assign classes to the input field, and submit for CSS styling
-
<input type ="text" name = "companyname" required class = "inputform"> </br>
- In the above code, the type keyword is used to determine the type of input in the input field.
- Also, the name keyword determines the input field used to submit the data to the server side.
- Additionally, the required keyword is used to ensure that the input field is not empty.
-
<input type="submit" value="SUBMIT" class = "buttonstyle">
- The type keyword i.e. type = “submit” is used to ensure after input the data should be submitted.
- The value keyword prints the text on the button.
-
<form action="/submit" method="POST"> </form>
- The action keyword i.e. action = “/submit” ensures after taking input the form data is submitted
- Whereas, the method keyword i.e. method=”POST” sends the data to the server side using the HTTP POST method
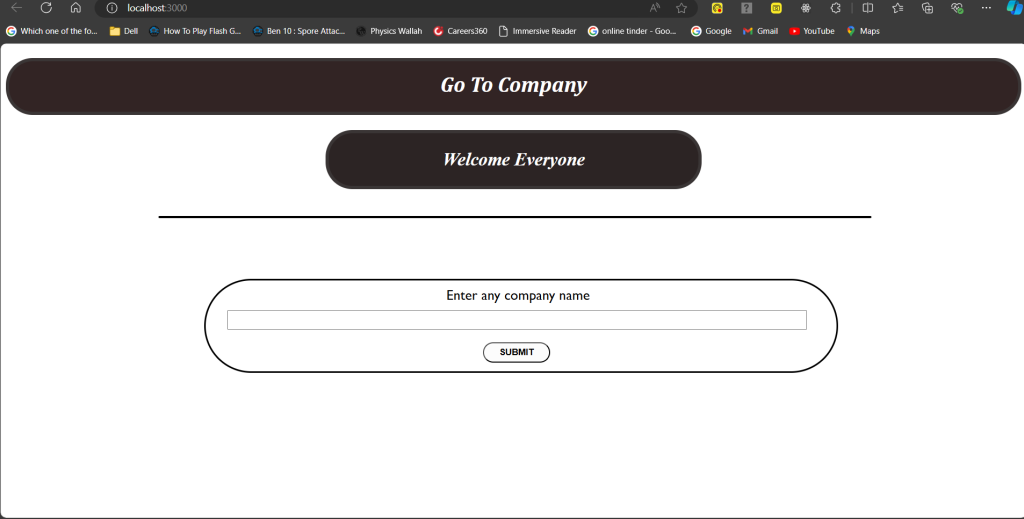
Steps to add the CSS styling
Follow the following steps to add CSS styling to make the website user interactive
- Now create a style tag in the HTML file i.e. <style> </style>
- Now assign classes to each tag in the form element and to the heading to add CSS styling
- For the input field take class = “inputform” to add the CSS styling
- For the submit button take class = “buttonstyle” to add the CSS styling
- Now to add CSS styling to the form create a div and assign class = “formbox”
<style>
    .headingone{
  text-align: center;
  font-family:Cambria, Cochin, Georgia, Times, 'Times New Roman', serif;
  font-style: italic;
  background-color: rgba(25, 9, 9, 0.889);
  color: white;
  height: 60px;
  padding-top: 15px;
  border-radius: 40px;
  border-color: rgb(58, 53, 53);
  border-width: 5px;
  border-style: solid;
}

.headingtwo{
  text-align: center;
  border-color: rgb(58, 53, 53);
  font-size: 27px;
  font-style: italic;
  border-width: 5px;
  border-style: solid;
  width: 550px;
  margin-left: 31.5%;
  min-height: 55px;
  padding-top: 24px;
  border-radius: 40px;
  color: white;
  background-color: rgba(28, 19, 19, 0.929);
}

.formbox{
  margin-top: 90px;
  margin-left: 19.5%;
  border-color: black;
  border-width: 3px;
  border-style: solid;
  padding-left: 32px;
  padding-top: 10px;
  width: 60%;
  min-height: 125px;
  border-radius: 70px;
}

.formbox:hover{
  background-color: rgba(191, 189, 189, 0.745);
  transition-duration: 0.3s;
  border-width: 5px;
}

.borderline{
  width: 70%;
  margin-left: 15%;
  margin-top: 40px;
  border-width: 2px;
  border-radius: 5px;
  border-color: black;
  border-style: solid;
}

.buttonstyle{
  margin-left: 42%;
  margin-top: 19px;
  height: 30px;
  width: 100px;
  border-radius: 20px;
  background-color: rgb(252, 252, 252);
  font-weight: 600;
}

.buttonstyle:hover{
  transition-duration: 0.8s;
  background-color: rgba(140, 46, 46, 0.99);
  cursor: pointer;
  font-size: 15px;
  font-style: italic;
}

.inputform{
  padding-top: 10px;
  padding-right: 79%;
  margin-top: 10px;
  font-weight: 700;
  font-family: 'Gill Sans', 'Gill Sans MT', Calibri, 'Trebuchet MS', sans-serif;
  font-style: italic;
}

.inputform:hover{
  cursor: pointer;
  transition-duration: 0.5s;
  border-color: black;
  border-width: 2px;
  border-style: solid;
}

.companyname{
  font-family: 'Gill Sans', 'Gill Sans MT', Calibri, 'Trebuchet MS', sans-serif;
  padding-left: 36%;
  font-size: 21px;
}
 </style>
Steps to create the server-side
Now follow the following steps to create a server-side
- In the first step install node.js from the browser, (Click here) to visit the webpage.
- In the next step install git bash from the browser, (Click here) to visit the webpage.
- In the next step use the code line node –v in the terminal to determine whether the node is installed or not.
- Now in the next step move to the folder where you created the HTML file using the command cd i.e. change directory.
- In the next step create a JS file in the same folder named newtask.js
- In the next step install the express.js in the same folder by using the code line npm install express.
- To execute the JS file use the code in the terminal i.e. node newtask.js.
- You use express.js to build the web application and node.js to run JS on the server.
- Now install nodemon in the terminal using the code line i.e. npm install nodemon.
- Now you can run the JS code by using nodemon also i.e. nodemon newtask.js.
- The nodemon automatically ends and restarts the server repeatedly when changes occur.
- In the next step, create a port in the file named newtask.js by using express.js.
- You use the port because the port is a way through which clients can interact with the server.
import express from "express" const app = express(); app.get('/', (req, res) => { res.send('<h1>Hi my name is Aditya Kumar Pradhan</h1>'); }); const port = 3000; app.listen(port, () => { console.log(`Server running at http://localhost:${port}/`); }); - import express from “express”
The above code line depicts that it imports the express.js library from the node modules that are present in the directory of our project.
- const app = express();
The above code line depicts that it creates a new web server application that will handle the incoming requests from the clients.
- app.get(‘/’, (req, res) => {res.send(‘<h1>Hi my name is aditya kumar pradhan</h1>’); });
As the above code line depicts it uses the GET requests method to fetch the data from the server
As req contains the information about the incoming requests, while res sends the response to the client
res.send(‘<h1>Hi my name is Aditya Kumar Pradhan </h1>’), it means it sends the response back to the client
- const port = 3000;
As the above code line sets the value of the port, that is on which port the server should show its data
- app.listen(port, () => { console.log(`Server running at http://localhost:${port}/`); });
As the above code shows, it starts the server on the port that the user has decided.
Steps to fetch the data from the server
Follow the steps to fetch the data from the side
- In the first step install the body-parser using the given code i.e. npm install body-parser.
- The body parser is being used to access the data from the server when a request is sent from the client side.
import express from "express"
import {dirname} from "path"
import { fileURLToPath } from "url";
const app = express()
const port = 3000;

const __dirname = dirname(fileURLToPath(import.meta.url))

var companyName = "";

app.use (express.urlencoded({extended: true}))

function extractCompnayName(req, res, next){
  console.log(req.body);
  companyName = req.body["companyname"]
  next();
}

app.use(extractCompnayName)

app.get("/", (req, res) => {
  res.sendFile(__dirname + "/form.html")
})

app.listen(port, () => {
  console.log(`The server is opening at http://localhost:${port}`)
})
- import {dirname} from “path”
The above code line retrieves the name of the directory where the server-side code is stored from the module named path
- import { fileURLToPath } from “url”;
The code line determines the exact location of the JavaScript file.
- const __dirname = dirname(fileURLToPath(import.meta.url))
The code line used to determine both the names and the exact location of the JavaScript file
- var bandName = “”;
This line stores the value entered by the users.
- app.use (express.urlencoded({extended: true}))
The above code is used to parse the data present in the server in a specific format called URL-encoded.
- function extractCompnayName(req, res, next){ console.log(req.body); bandName = req.body[“companyname”] next(); }
The code creates a function that takes the information from the request body i.e. companyname and stores it in the global variable named bandName
Here request body means the value sent by the user to the server in the request body from the HTML file.
- app.use(extractCompnayName)
You use the above line to apply middleware functions to all the incoming requests from the HTML file.
The middleware function extracts all the requests from the request body and stores them in variable named companyName
- app.get(“/”, (req, res) => { res.sendFile(__dirname + “/form.html”) })
The code uses the GET HTTP method to fetch the HTML file through the file path
- Now in the next step use the POST HTTP method to store the data in the server side
import express from "express"
import {dirname} from "path"
import { fileURLToPath } from "url";
const app = express()
const port = 3000;
const __dirname = dirname(fileURLToPath(import.meta.url))
var companyName = "";
app.use (express.urlencoded({extended: true}))
function extractCompnayName(req, res, next){
console.log(req.body);
companyName = req.body["companyname"]
next();
}
app.use(extractCompnayName)
app.get("/", (req, res) => {
res.sendFile(__dirname + "/form.html")
})
app.post("/submit", (req, res) => {
if(companyName === "google") {
res.send("<h1>The official website url</h1></br><h2>https://www.google.com/</h2>")
}
else if (companyName === "apple") {
res.send("<h1>The official website url</h1></br><h2>https://www.apple.com/in/?afid=p238%7Cs8Vs8GkTq-dc_mtid_187079nc38483_pcrid_703367968965_pgrid_112258962467_pntwk_g_pchan__pexid__ptid_kwd-10778630_&cid=aos-IN-kwgo-brand--slid---product-</h2>")
}
else if (companyName === "starbucks") {
res.send("<h1>The official website url</h1></br><h2>https://www.starbucks.in/dashboard</h2>")
}
else if (companyName === "amazon"){
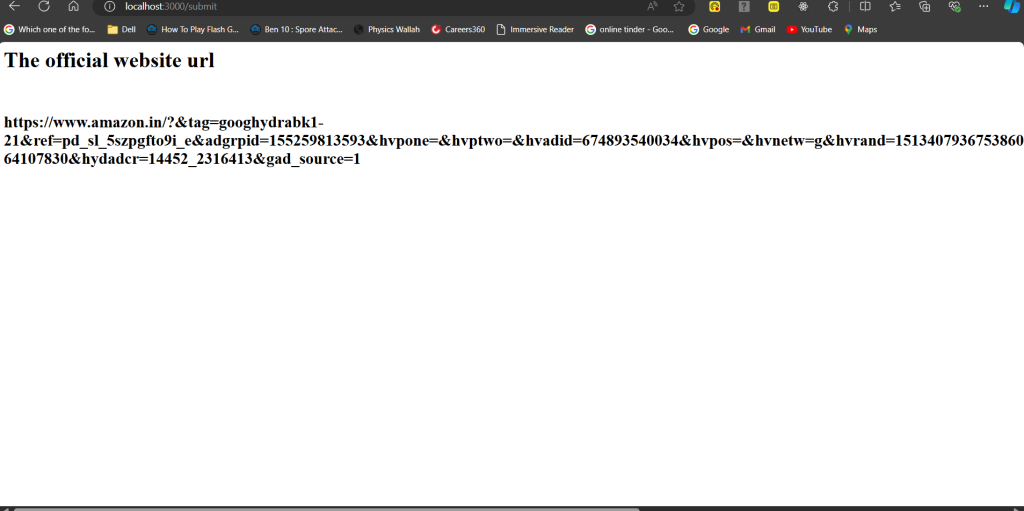
res.send("<h1>The official website url</h1></br><h2>https://www.amazon.in/?&tag=googhydrabk1-21&ref=pd_sl_5szpgfto9i_e&adgrpid=155259813593&hvpone=&hvptwo=&hvadid=674893540034&hvpos=&hvnetw=g&hvrand=15134079367538608246&hvqmt=e&hvdev=c&hvdvcmdl=&hvlocint=&hvlocphy=9152448&hvtargid=kwd-64107830&hydadcr=14452_2316413&gad_source=1</h2>")
}
else if (companyName === "microsoft") {
res.send("<h1>The official website url</h1></br><h2>https://www.microsoft.com/en-in</h2>")
}
else if (companyName === "flipkart") {
res.send("<h1>The official website url</h1></br><h2>https://www.flipkart.com/?affid=admitad&affExtParam1=1323002&affExtParam2=6583c15a5d81faf47e80aa88dd8700b0</h2>")
}
else if (companyName === "tata") {
res.send("<h1>The official website url</h1></br><h2>https://www.tata.com/</h2>")
}
else if (companyName === "cocacola") {
res.send("<h1>The official website url</h1></br><h2>https://www.coca-colacompany.com/</h2>")
}
else if (companyName === "reliance") {
res.send("<h1>The official website url</h1></br><h2>https://www.ril.com/</h2>")
}
else if (companyName === "boat") {
res.send("<h1>The official website url</h1></br><h2>https://www.boat-lifestyle.com/collections/?utm_source=Google&utm_medium=Search&utm_campaign=SB_Search_Return_Brand_India_Sep2020&utm_source=google&utm_medium=cpc&utm_campaign=11206527317&gad_source=1&gclid=CjwKCAjwodC2BhAHEiwAE67hJPHjZOrWOLfSQ6y4Q5EskvHrHvVWGCpRbyusmn8XH4igC2bIktP6TxoCToAQAvD_BwE</h2>")
}
else if (companyName === "sony") {
res.send("<h1>The official website url</h1></br><h2>https://www.sony.co.in/homepage</h2>")
}
else{
res.send(`<h1>Unrecognized input, the first letter should be in uppercase: ${userInput}</h1>`)
}
})
app.listen(port, () => {
console.log(`The server is opening at http://localhost:${port}`)
Run the server
Follow the steps to run the server
- In the first step open the terminal
- In the next step change the directory that contains both HTML and JS file
- Now run the server using the code i.e. nodemon newtask.js
- Then click on the link i.e. http://localhost:3000
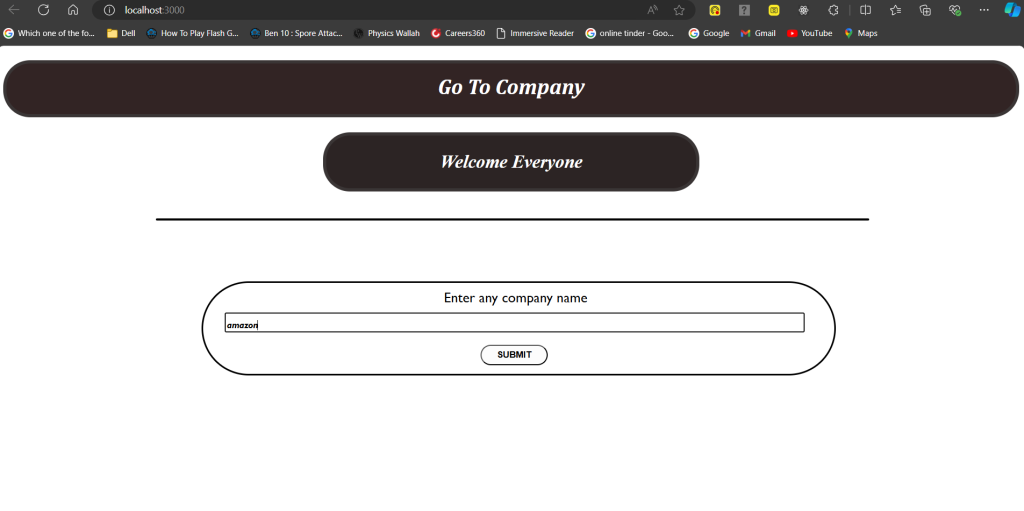
Output
Let us take an example in the input field take amazon as input
After submitting the value the output is shown below