The following tutorial will describe the filling of a webpage form using the Python library pyautogui, including one sample webpage form. The given Python script will start the automation of filling out this form using pyautogui. It basically fakes mouse clicks and typing in the form fields based on the coordinates of the screen
Automate form filling with PyAutoGUI
This automation in web form filling saves a lot of time, not only for you but also for other users and also testers and developers who work frequently with online forms. The easiest, most effective solution to this is the PyAutoGUI Python library-which makes controlling your mouse and keyboard programmatically a breeze.
PyAutoGUI: The Power for Python Scripts to Automate GUIs
PyAutoGUI is a cross-platform Python library to do things on the graphical user interface. It gives you control over the mouse, keyboard, and other input devices programmatically, allowing you to perform many tasks in a much more human-like fashion. From automating repetitive tasks, testing software, to capturing screenshots, PyAutoGUI does quite a number of things.
Python code for filling webpage automatically using PyAutoGUI
Install the PyAutoGUI library
for window
pip install pyautogui
for Linux
sudo apt-get install scrot python3-tk python3-dev python3-xlib
for macOs
pip3 install pyautogui
After installing library create a sample webpage for using html
form code:
<!DOCTYPE html>
<html lang="en">
<head>
    <meta charset="UTF-8">
    <meta name="viewport" content="width=device-width, initial-scale=1.0">
    <title>Form</title>
    <style>
        body {
            font-family: Arial, sans-serif;
            margin: 50px;
        }
        label {
            display: block;
            margin-top: 20px;
        }
        input[type="text"], input[type="email"] {
            width: 300px;
            padding: 10px;
            margin-top: 5px;
            font-size: 16px;
        }
        input[type="submit"] {
            margin-top: 20px;
            padding: 10px 20px;
            font-size: 16px;
            cursor: pointer;
        }
    </style>
</head>
<body>
    <h1>Form </h1>
    <form id="testForm">
        <label for="firstName">First Name:</label>
        <input type="text" id="firstName" name="firstName">

        <label for="lastName">Last Name:</label>
        <input type="text" id="lastName" name="lastName">

        <label for="email">Email:</label>
        <input type="email" id="email" name="email">

        <br><input type="submit" value="Submit">
    </form>

</body>
</html>
Python code:
import pyautogui
import time

# Wait to switch to the browser with the form
time.sleep(5)

# Move to First Name field
pyautogui.moveTo(500, 300)
pyautogui.click()
pyautogui.write('Pavan')

# Move to Last Name field
pyautogui.moveTo(500, 400)
pyautogui.click()
pyautogui.write('Narasimha')

# Move to Email field
pyautogui.moveTo(500, 500)
pyautogui.click()
pyautogui.write('[email protected]')

# Move to Submit button
pyautogui.moveTo(500, 550)
pyautogui.click()

# Captures the screenshort
pyautogui.screenshot('form_filled.png')

# Shows the confirmation
print("Form filled")
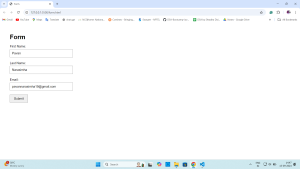
Output:
After form is filled it captures a screenshort and message will be displaced on terminal
Form filled