Creating a personal portfolio website is an excellent way to showcase your skills, projects, and achievements to potential employers or clients. This guide will walk you through the steps to build a professional portfolio website using HTML and CSS.
A personal portfolio website is more than just an online resume; it’s your digital identity and a platform to showcase your skills, projects, and achievements to the world. Whether you’re a student, a freelancer, or a seasoned professional, having a well-crafted portfolio can make a significant impact.
Steps to build up the project
Step 1: Set Up Your Personal Portfolio Website with HTML and CSS
- Download Visual Studio Code: Download and install Visual Studio Code from https://code.visualstudio.com/.
- Create a Folder: Organize your project files by creating a folder. Inside it, add these files:
index.html(for structure)styles.css(for styling)
Step 2: Creating the HTML Structure for Your Personal Portfolio Website with HTML and CSS
Start by structuring the main sections of your portfolio:
http://<link rel=”stylesheet” href=”styles.css”>
<!DOCTYPE html>
<html lang="en">
<head>
    <meta charset="UTF-8">
    <meta name="viewport" content="width=device-width, initial-scale=1.0">
    <title>My Portfolio</title>
    <link rel="stylesheet" href="styles.css">
</head>
<body>
    <header class="header">
        <h1>Welcome to My Portfolio</h1>
        <nav class="navbar">
            <a href="#about">About</a>
            <a href="#projects">Projects</a>
            <a href="#contact">Contact</a>
        </nav>
    </header>

    <section id="about" class="about">
        <h2>About Me</h2>
        <p>Hello! I'm DHANUSYA K, a passionate web developer skilled in HTML, CSS, and JavaScript.</p>
    </section>

    <section id="projects" class="projects">
        <h2>My Projects</h2>
        <div class="project-card">
            <h3>Project 1</h3>
            <p>A brief description of your project.</p>
        </div>
        <div class="project-card">
            <h3>Project 2</h3>
            <p>A brief description of your project.</p>
        </div>
    </section>

    <section id="contact" class="contact">
        <h2>Contact Me</h2>
        <form>
            <label for="name">Name:</label>
            <input type="text" id="name" name="name" required>
            <label for="email">Email:</label>
            <input type="email" id="email" name="email" required>
            <button type="submit">Submit</button>
        </form>
    </section>

    <footer class="footer">
        <p>© 2025 DHANUSYA K. All rights reserved.</p>
    </footer>
</body>
</html>
Step 3: Enhance Your Personal Portfolio Website with HTML and CSS
Create a clean and visually appealing design using CSS.
/* General Styles */
body {
    font-family: Arial, sans-serif;
    margin: 0;
    padding: 0;
    line-height: 1.6;
    background-color: #f4f4f9;
    color: #333;
}

.header {
    background: #007bff;
    color: #fff;
    padding: 20px;
    text-align: center;
}

.navbar a {
    color: #fff;
    margin: 0 10px;
    text-decoration: none;
}

.navbar a:hover {
    text-decoration: underline;
}

section {
    padding: 20px;
    margin: 20px;
    background: #fff;
    border-radius: 8px;
    box-shadow: 0 4px 6px rgba(0, 0, 0, 0.1);
}

.projects .project-card {
    background: #f9f9f9;
    margin: 10px 0;
    padding: 10px;
    border-left: 5px solid #007bff;
}

.contact form {
    display: flex;
    flex-direction: column;
    gap: 10px;
}

.contact form input,
.contact form button {
    padding: 10px;
    border: 1px solid #ddd;
    border-radius: 5px;
}

.contact form button {
    background: #007bff;
    color: #fff;
    border: none;
}

.footer {
    text-align: center;
    padding: 10px;
    background: #333;
    color: #fff;
}
Step 4: Add Enhancements (Optional)
- Responsive Design: Use media queries to ensure your site looks great on mobile and desktop screens.
- Animations: Add hover effects or transitions to buttons and links using CSS.
- Icons: Include social media icons with Font Awesome.
Step 5: Preview Your Portfolio
- Save all files and open
index.htmlin your browser. - Use the Live Server extension in Visual Studio Code for real-time previews.
Output:
Your portfolio will include:
- A navigation bar for easy browsing.
- An “About Me” section to introduce yourself.
- A “Projects” section to highlight your work.
- A “Contact” form for inquiries.
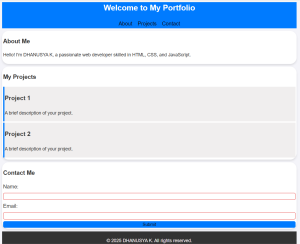
This basic structure provides a strong foundation to showcase your skills and creativity. You can expand it further with additional sections or advanced interactivity.