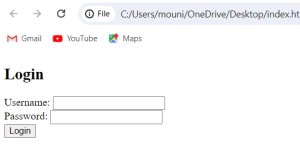
A simple login form is a user interface component typically found on websites or applications that require user authentication. It consists of input fields for the user to enter their credentials usually a username or email and a password and there should be a submit button to initiate the login process.
How to create a simple login form
here are the steps:
- Create a new folder for your project and inside the folder create two fields, those are:’index.html’ and ‘styles.css’.
- Open the file ‘index.html’ and create the basic structure of an HTML document.
- Inside the ‘<body>’ tag, create a ‘<form>’ element to hold your login form.
- Inside the ‘<form>’ elements, add ‘<input>’ elements for username and password. Use the ‘type’ attribute to specify the input type “text” for username and “password” for password.
- Add ‘<label>’ elements for each input field to provide a discription .
- Add a ‘<button>’ element inside a form to act as a submit button.
- Open ‘style.css’ and add CSS rules to style the login form.
- Open ‘index.html’ which is on desktop in a web browser and test your login form.
index.html:
<!DOCTYPE html>
<html lang="en">
<head>
<meta charset="UTF-8">
<meta name="viewport" content="width=device-width, initial-scale=1.0">
<title>Login Form</title>
<link rel="stylesheet" href="styles.css">
</head>
<body>
<div class="login-container">
<h1>Login</h1>
<form action="#">
<div class="input-group">
<label for="username">Username:</label>
<input type="text" id="username name="username" required>
</div>
<div class="input-group">
<label for="password">Password:</label>
<input type="password" id="password" name="password" required>
</div>
<button type="submit">Login</button>
</form>
</div>
</body>
</html>
styles.css
body
{
margin: 0;
padding: 0;
font-family: Arial, sans-serif;
display: flex;
justify-content: center;
align-items: center;
height: 100vh;
background-color: red;
}
.login-container
{
background-color: red;
padding: 20px;
border-radius: 8px;
box-shadow: 0 0 10px rgba(0, 0, 0, 0.1);
}
h2
{
text-align: center;
}
.input-group
{
margin-bottom: 15px;
}
.input-group label
{
display: block;
margin-bottom: 5px;
}
.input-group input
{
width: 100%;
padding: 8px;
border: 1px solid;
border-radius: 4px;
}
button
{
width: 100%;
padding: 10px;
border: none;
border-radius: 4px;
background-color: red;
color: pink;
cursor: pointer;
}
button: hover
{
background-color: red;
}
OUTPUT:
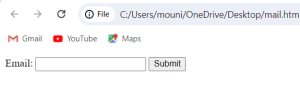
Email id validation using JavaScript
Validating email addresses using JavaScript involves checking if the input provided by the user matches a certain pattern that conforms to the standard format of an email address.
here are the steps:
- Create an HTML file where form elements are defined for the email address and displaying error messages.
- Define JavaScript functions to handle form submission and validate the email address entered by the user.
- Attach event listeners to the form elements for validation when the form is submitted.
- show error messages if the email address entered by the user is invalid
<!DOCTYPE html>
<html lang="en">
<head>
<meta charset="UTF-8">
<meta name="viewport" content="width=device-width, initial-scale=1.0">
<title>Email Validation</title>
</head>
<body>
<form id="emailForm">
<label for="email>Email:</label>
<input type="text" id="email" name="email">
<button type="submit">Submit</button>
</form>
<div id="error-message" style="color: red;"></div>
<script>
function validationEmail(email)
{
const regex = /^[^\s@]+@[^\s@]+\.[^\s@]+$/;
return regex.test(email);
}
function handleSubmit(event)
{
event.preventDefault();
const emailInput = document.getElementById('email');
const errorMessage = document.getElementById('error-message');
const email = emailInput.value;
if (validateEmail(email))
{
errorMessage.textContent = '';
alert('Email is valid!');
}
else
{
errorMessage.textContent = 'please enter a valid email address.';
}
}
const form = document.getElementById('emailForm');
form.addEventListener('submit', handleSubmit);
</script>
</body>
</html>
OUTPUT:
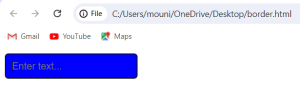
Change text box color on a web page
To change the text box color on a web page, you can use CSS.
here are the steps:
- Create CSS directly in your HTML file using ‘<style>’tags within the ‘<head>’ section or create an external CSS file and link it to your HTML file using the'<link>’ tag.
- Use CSS selectors to target the specific text box you want to style.
- Set the color for the text box using CSS properties such as ‘background-color’ , ‘border-color’ , ‘color’ , etc.
- Open your HTML file which is on desktop in a web browser and verify that the text box color has changed.
<!DOCTYPE html>
<html lang="en">
<head>
<meta charset="UTF-8">
<meta name="viewport" content="width=device-width, initial-scale=1.0">
<title>Change Text Box Color</title>
<style>
#myTextBox
{
padding: 10px;
border:2px solid red;
border-radius: 5px;
font-size: 16px;
background-color: blue;
}
#myTextBox:focus
{
border-color: pink;
}
</style>
</head>
<input type="text" id="myTextBox" placeholder="Enter text...">
</body>
</html>
OUTPUT: