This tutorial demonstrates creating a QR code generator from scratch in a web application.
We use HTML, CSS, and Javascript to make this QR code Generator.
I try to explain things most simply so you can understand them easily.
What is a QR Code?
- QR code stands for Quick Response Code.
- A QR Code stores information as a 2D or two-dimensional barcode.
- It can store information for quick access.
- Display as a pattern of black and white square boxes.
Look like this ->
What is a QR Code generator?
- It is a tool or software application that makes QR Codes. Users can input any specific URL, text, or information. And this generator converts into a QR Code.
- Then it is displayed or printed for others to scan and access the stored information with the help of mobile applications or scanners.
Which technology is used to create a QR Code generator?
Developers mainly use HTML(Hypertext Markup Language), CSS(Cascading Style Sheets), and JavaScript to create this QR Code generator.
- HTML: Used for designing the interface.
- CSS: It is used for styling.
- JavaScript: Used to add interactivity and functionality to web pages.
Create Frontend interface:
Using HTML:
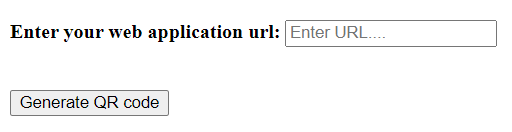
Create frontend basic structure with the help of HTML..
<!DOCTYPE html>
<html lang="en">
<head>
    <meta charset="UTF-8">
    <meta name="viewport" content="width=device-width, initial-scale=1.0">
    <title>QR code generator</title>
    <link rel="stylesheet" href="style.css">
</head>
<body>
    <div class="container">
        <p><b>Enter your web application url:</b>
        <input type="text" id="qrtext" placeholder="Enter URL...."></p>
        <div id="imagebox">
            <img src="" id="qrimage" class="center">
        </div>
        <button onclick="generateQR()">Generate QR code</button>
    </div>
    <script src="index.js"></script>
</body>
</html>
Output:
 Using CSS :
The frontend interface looks simple and not atractive as of now.So, we add some style with CSS
*{
    margin: 0;
    padding: 0;
    font-family: Arial, Helvetica, sans-serif;
    box-sizing: border-box;
}
body{
    background: rgb(230, 246, 255);
}
.container{
    width: 400px;
    padding: 25px 35px;
    position: absolute;
    top: 50%;
    left: 50%;
    transform: translate(-50%,-50%);
    background: rgb(255, 255, 255);
    border-radius: 10px;
    border: 2px solid #09004D;
}
.container p{
    font-size: 20px;
    margin-bottom: 10px;
}
.container input{
    width: 100%;
    height: 25px;
    border: 1px solid #09004D;
    border-radius: 5px;
    padding: 10px;
    margin: 5px 0 10px;
}
.container button{
    width: 100%;
    height: auto;
    padding: 10px;
    margin: 5px 0 10px;
    border: 1px solid #0b0535;
    box-shadow: 0 2px 4px 0 #50469B ;
    background: #4fb3ff;
    cursor: pointer;
}
.center{
    display: block;
    margin-left: auto;
    margin-right: auto;
    width: 50%;
}
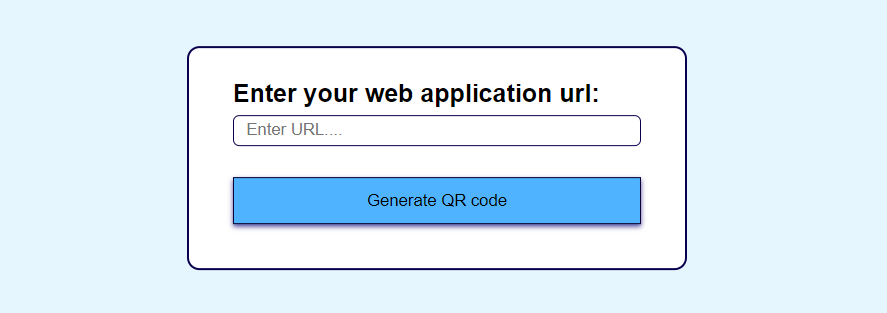
Output:
After using CSS, the frontend User interface looks good as below:
Using JavaScript:
Make an ‘index.js’ file to handel from data and create QR codes using the API..
function generateQR(){
    if(qrtext.value.length>0){
        qrimage.src ="https://api.qrserver.com/v1/create-qr-code/?size=150x150&data="+qrtext.value; //QR code API used
    }
    else{
        alert("Enter URL");
    }
    }
let imagebox =document.getElementById("imagebox");
    let qrimage =document.getElementById("qrimage");
    let qrtext =document.getElementById("qrtext");
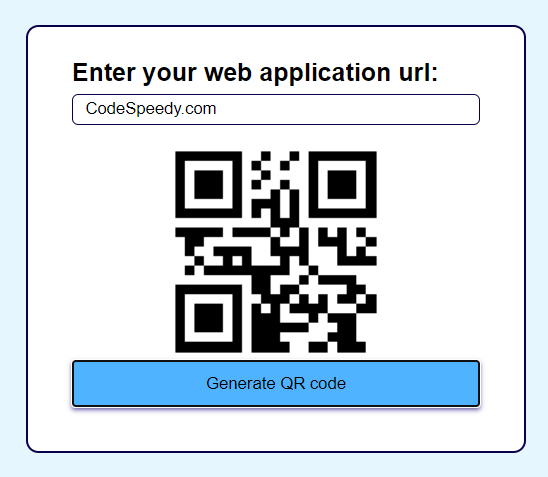
Final output: