In this tutorial, I’ll walk you through the process of building a color picker from scratch using HTML, CSS, and JAVASCRIPT.
In the picker whichever color you choose of your choice, the color will be shown on the box below.
Initial setup
Before proceeding It is essential that we first set up our HTML, CSS, and JAVASCRIPT files. First, create three files under one folder of your choice then name them as index.html, style.css, and script.js respectively.
Now we will connect CSS and script to our HTML file to prevent any bugs or unwanted problems further.
index.html
<!DOCTYPE html>
<html lang="en">
<head>
    <meta charset="UTF-8">
    <meta name="viewport" content="width=device-width, initial-scale=1.0">
    <title>Colour Picker</title>
    <link rel="stylesheet" href="style.css">
</head>
<body>
    <script src="script.js"></script>
</body>
</html>
HTML structure
We will now first add an input element for selecting colors, a div to show the chosen color, and enclose them with a div for better structuring.
Here’s the code for reference.
index.html
<!DOCTYPE html>
<html lang="en">
<head>
    <meta charset="UTF-8">
    <meta name="viewport" content="width=device-width, initial-scale=1.0">
    <title>Colour Picker</title>
    <link rel="stylesheet" href="style.css">
</head>
<body>
    <div class="colour-picker-container">
        <input type="color" id="colourPicker" name="colourPicker">
        <label for="colourPicker">Choose a colour</label>
        <div class="colour-display" id="colourDisplay"></div>
    </div>

    <script src="script.js"></script>
</body>
</html>
CSS Styling
After completing the HTML structure, we will enhance the visual appeal of our components using CSS. We will center the color picker along with the display div and apply stylistic improvements to create a more pleasing appearance.
style.css
body {
    display: flex;
    justify-content: center;
    align-items: center;
    padding: 3rem;
}

.colour-picker-container {
    display: flex;
    flex-direction: column;
    align-items: center;
    background: white;
    padding: 20px;
    border-radius: 10px;
    box-shadow: 10px 10px 5px rgba(0, 0, 0, 0.1);
}

#colourPicker {
    margin-bottom: 10px;
}

.colour-display {
    width: 100px;
    height: 100px;
    border: 1px solid #ddd;
    border-radius: 5px;
}
JavaScript Functionality
Finally, we will add the functionality using JavaScript. The script will look for changes in the color input and update the background color on the div below accordingly.
script.js
const colourPicker = document.getElementById('colourPicker');
const colourDisplay = document.getElementById('colourDisplay');

colourPicker.addEventListener('input', function() {
        colourDisplay.style.backgroundColor = colourPicker.value;
});

colourDisplay.style.bactkgroundColor = colourPicker.value;
How it works?
- HTML: The input element allows user to pick up a color of their choice. The div with the ID ‘colourDisplay’ shows the selected color.
- CSS: The ‘color-picker-container’ class styles the container, and the ‘colour-display’ class styles the color display box.
- JavaScript: The script gets the element using their given ids and listens for change in color in input element and then changes the color display box according to it.
Conclusion
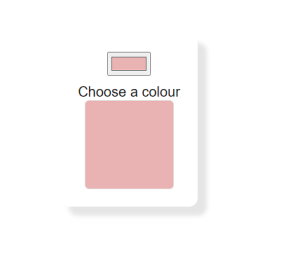
If you have followed the steps properly throughout the article then your project should be up and working.
After completing your project should look like this.

Learn more:
BMI Calculator Using JavaScript
Know more about DOM (Document Object Model)
Show/Hide Password Option in a Login Form Using JavaScript