Creating the Google webpage using HTML and CSS.
Google’s landing page is a simple and effective masterpiece . Replicating it can be a good exercise for learning HTML and CSS basics. In this article, we’ll will learn through the steps to create a Google webpage page using HTML and CSS from the very scratch.
Pre-requisite:
- A text editor or IDE that suits you well (e.g.: Visual Studio Code, Sublime Text, Notepad++).
- A web browser for running and testing (e.g.: Google Chrome, Mozilla Firefox, Brave).
- Basic understanding of HTML and CSS syntaxes.
Step-by-Step Guide to Replicating Google webpage using HTML and CSS:
Following these steps you can create the google webpage replica by yourself. It is a good practice of sharpening your HTML and CSS skills.
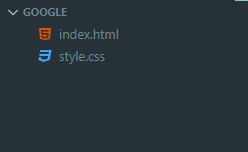
Step 1: Project folder setup
- Create a folder named:
Google - Inside this folder create 2 files:
index.htmlstyle.css
Step 2: HTML structure index.html.
2.0 : Let’s Start with the basic boiler plate syntax of HTML file.
<!DOCTYPE html>
<html lang="en">
<head>
    <meta charset="UTF-8">
    <meta name="viewport" content="width=device-width, initial-scale=1.0">
    <title>Document</title>
</head>
<body>

</body>
</html>
2.1 : Change the title of the file from “Document” to “Google”.
<!DOCTYPE html>
<html lang="en">
<head>
    <meta charset="UTF-8">
    <meta name="viewport" content="width=device-width, initial-scale=1.0">
    <title>Google</title>
</head>
<body>

</body>
</html>
2.2 : Inside the body tag create a div element and give it a ‘class’ attribute with value “container”.
This will be our main container, inside of which all the elements of the webpage will reside in.
<!DOCTYPE html>
<html lang="en">
<head>
    <meta charset="UTF-8">
    <meta name="viewport" content="width=device-width, initial-scale=1.0">
    <title>Google</title>
</head>
<body>
    <div class="container"></div>
</body>
</html>
2.3 : Inside the div create another div element and give it a ‘class’ attribute with value “logo”.
This will be the logo-container div inside which the Google logo will be inserted.
<!DOCTYPE html>
<html lang="en">
<head>
    <meta charset="UTF-8">
    <meta name="viewport" content="width=device-width, initial-scale=1.0">
    <title>Google</title>
</head>
<body>
    <div class="container">
        <div class="logo"></div>
    </div>
</body>
</html>
2.4 : Inside the div with ‘logo’ class add an <img> tag.
Now give the value of the src attribute : https://www.google.com/images/branding/googlelogo/1x/googlelogo_color_272x92dp.png
And for the alt enter ‘Google Logo’.
<!DOCTYPE html>
<html lang="en">
<head>
    <meta charset="UTF-8">
    <meta name="viewport" content="width=device-width, initial-scale=1.0">
    <title>Google</title>
</head>
<body>
    <div class="container">
        <!-- Google Logo -->
        <div class="logo">
            <img src="https://www.google.com/images/branding/googlelogo/1x/googlelogo_color_272x92dp.png" alt="Google Logo">
        </div>
    </div>
</body>
</html>
2.5 : Inside the div with class ‘container’ create another div element and give it a ‘class’ attribute with value “search-container”.
This will be the search bar-container. This HTML code creates a simple search bar with a search icon and a microphone icon, mimicking Google’s design. It uses a div with the class search-container as the outer wrapper and another div with search-bar-container for grouping elements inside. The input field, defined with input and the search-bar class, allows users to type their queries, and the placeholder attribute displays the hint “Search Google or type a URL.” To use the icons, you need to include the Font Awesome library in your HTML file. This structure is clean, functional, and serves as a great starting point for further customization. Here we will use Font Awesome for icons like search icon and microphone icon for that we will need the CDN of their library.
<!DOCTYPE html>
<html lang="en">
<head>
    <meta charset="UTF-8">
    <meta name="viewport" content="width=device-width, initial-scale=1.0">
    <title>Google</title>
    <link rel="stylesheet" href="https://cdnjs.cloudflare.com/ajax/libs/font-awesome/6.0.0-beta3/css/all.min.css"> <!-- Font Awesome -->
</head>
<body>
    <div class="container">
        <!-- Google Logo -->
        <div class="logo">
            <img src="https://www.google.com/images/branding/googlelogo/1x/googlelogo_color_272x92dp.png" alt="Google Logo">
        </div>

        <!-- Search Bar -->
        <div class="search-container">
            <div class="search-bar-container">
                <i class="fas fa-search search-icon"></i>
                <input type="text" class="search-bar" placeholder="Search Google or type a URL">
                <i class="fas fa-microphone mic-icon"></i>
            </div>
        </div>

    </div>
</body>
</html>
2.6 Create a div tag inside the container div and give it class of ‘button-container’.
This HTML code creates two buttons styled like Google’s homepage, placed inside a div with the class button-container for organization. Each button is defined using the button tag with the search-button class, making them easy to style uniformly. The first button includes the Font Awesome search icon with class fas fa-search and the text “Google Search,” while the second uses the laugh icon (fas fa-laugh) and the text “I’m Feeling Lucky.” To display these icons, ensure you include the Font Awesome library in your HTML file.
<!DOCTYPE html>
<html lang="en">
<head>
    <meta charset="UTF-8">
    <meta name="viewport" content="width=device-width, initial-scale=1.0">
    <title>Google</title>
    <link rel="stylesheet" href="style.css"> <!-- Link to your CSS file -->
    <link rel="stylesheet" href="https://cdnjs.cloudflare.com/ajax/libs/font-awesome/6.0.0-beta3/css/all.min.css"> <!-- Font Awesome -->
    <link rel="icon" href="https://www.google.com/favicon.ico">
</head>
<body>
    <div class="container">
        <!-- Google Logo -->
        <div class="logo">
            <img src="https://www.google.com/images/branding/googlelogo/1x/googlelogo_color_272x92dp.png" alt="Google Logo">
        </div>

        <!-- Search Bar -->
        <div class="search-container">
            <div class="search-bar-container">
                <i class="fas fa-search search-icon"></i>
                <input type="text" class="search-bar" placeholder="Search Google or type a URL">
                <i class="fas fa-microphone mic-icon"></i>
            </div>
        </div>

        <!-- Buttons -->
        <div class="button-container">
            <button class="search-button"><i class="fas fa-search"></i> Google Search</button>
            <button class="search-button"><i class="fas fa-laugh"></i> I'm Feeling Lucky</button>
        </div>
    </div>
</body>
</html>
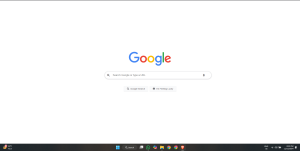
Now, Open the index.html from the folder from file explorer.

If you follow this tutorial to create a Google homepage using HTML and CSS your html file will look like this is a web browser.
Step 3: Styling the webpage
After we’re done with the HTML file next we will do the styling in the style.css file.
body, html {
    margin: 0;
    padding: 0;
    font-family: Arial, sans-serif;
}

.container {
    display: flex;
    flex-direction: column;
    align-items: center;
    justify-content: center;
    height: 100vh;
}
.logo img {
    width: 272px;
    height: auto;
    margin-bottom: 30px;
}
.search-container {
    display: flex;
    justify-content: center;
    width: 100%;
}
.search-bar {
    width: 580px;
    padding: 14px 20px;
    border: 1px solid #dfe1e5;
    border-radius: 24px;
    box-shadow: 0 1px 6px rgba(32, 33, 36, 0.28);
    outline: none;
    font-size: 16px;
    transition: box-shadow 0.2s ease-in-out;
}
.search-bar:focus {
    box-shadow: 0 1px 6px rgba(32, 33, 36, 0.38);
}

.button-container {
    margin-top: 20px;
}
.search-button {
    padding: 10px 20px;
    margin: 5px;
    border: none;
    border-radius: 4px;
    background-color: #f8f9fa;
    box-shadow: 0 1px 2px rgba(0, 0, 0, 0.1);
    color: #5f6368;
    cursor: pointer;
    transition: background-color 0.3s ease-in-out, box-shadow 0.2s ease-in-out;
}

.search-button:hover {
    background-color: #f1f3f4;
    box-shadow: 0 1px 3px rgba(60, 64, 67, 0.15);
}
.search-button:active {
    background-color: #e8eaed;
}
This CSS code styles a replica of the Google homepage, providing a clean, minimalist design. The body and html tags are reset with zero margins and padding, and a sans-serif font is applied for a modern look. The `.container` class uses Flexbox to vertically and horizontally center its content, occupying the full viewport height (100vh). The ‘.logo img‘ class sets the logo size with a fixed width while maintaining aspect ratio, and adds spacing below it.
The .search-container centers the search bar horizontally, with its width adjusted to stretch across the page. Then, .search-bar-container will position itself relatively and allow proper placement of icons around the search bar. The .search-bar input padding accommodates the icons, round the corners, and give a light shadow, and a focus effect highlights the bar with a darker shadow. The .search-icon and .mic-icon will be positioned absolutely within the .search-bar-container for alignment, with colors chosen to match Google’s design.
The .button-container arranges the buttons in a horizontal row, with spacing applied between them. The .search-button is styled with padding, rounded corners, and a light background color, with hover and active effects designed to enhance user interaction. Flexbox is used within the buttons to align the text and icons, with a gap specified to provide spacing between them. The CSS ensures that the design is responsive, visually appealing, and functional.