In this tutorial, we will learn how to design a responsive login page using Bootstrap in Visual Studio Code. Bootstrap is a popular front-end framework that helps developers create responsive and mobile-first websites quickly. With its pre-built components and powerful grid system, creating a stylish and functional login page becomes much easier.
In this guide, we’ll cover the following steps:
- Setting up Visual Studio Code and installing Bootstrap.
- Building the login page structure.
- Customizing the design using CSS.
Steps to Create the Login Page
1. Install Visual Studio Code:
- Download and install Visual Studio Code from https://code.visualstudio.com/.
- Install the following extensions:
- Live Server: For real-time previews.
- Bootstrap 4, Font awesome snippets: For Bootstrap and icon snippets.
2. Set Up Your Project Directory:
- Create a folder for your project, for example,
C:\Projects\ResponsiveLogin. - Open the folder in Visual Studio Code:
- Go to
File > Open Folder, then select your project folder.
- Go to
3. Include Bootstrap in Your Project:
- Open your
index.htmlfile and add the following code to include Bootstrap:
<link href="https://maxcdn.bootstrapcdn.com/bootstrap/4.5.2/css/bootstrap.min.css" rel="stylesheet">
4. Create the HTML Structure:
Now, let’s build the login page structure using Bootstrap’s components.
- Inside your project folder, create a file called
index.html. - Add the following HTML code:
<!DOCTYPE html>
<html lang="en">
<head>
    <meta charset="UTF-8">
    <meta name="viewport" content="width=device-width, initial-scale=1.0">
    <title>Login</title>
    <link href="https://maxcdn.bootstrapcdn.com/bootstrap/4.5.2/css/bootstrap.min.css" rel="stylesheet">
    <link href="styles.css" rel="stylesheet">
</head>
<body>
    <div class="container">
        <div class="row justify-content-center">
            <div class="col-md-6">
                <div class="card">
                    <div class="card-header text-center">
                        <h2>Login</h2>
                    </div>
                    <div class="card-body">
                        <form>
                            <div class="form-group">
                                <label for="email">Email address</label>
                                <input type="email" class="form-control" id="email" placeholder="Enter email">
                            </div>
                            <div class="form-group">
                                <label for="password">Password</label>
                                <input type="password" class="form-control" id="password" placeholder="Password">
                            </div>
                            <button type="submit" class="btn btn-primary btn-block">Login</button>
                        </form>
                    </div>
                    <div class="card-footer text-center">
                        <a href="registration.html">Don't have an account? Register here</a>
                    </div>
                </div>
            </div>
        </div>
    </div>
    <script src="https://code.jquery.com/jquery-3.5.1.slim.min.js"></script>
    <script src="https://cdn.jsdelivr.net/npm/@popperjs/[email protected]/dist/umd/popper.min.js"></script>
    <script src="https://maxcdn.bootstrapcdn.com/bootstrap/4.5.2/js/bootstrap.min.js"></script>
</body>
</html>
5. Create a Custom CSS File (Optional):
You can create a custom styles.css file to adjust the appearance of the page and make it more unique.
- Create a new file called
styles.css. - Add custom styles:
body {
    background-color: #f8f9fa;
    font-family: Arial, sans-serif;
}
.card {
    margin-top: 100px;
    box-shadow: 0 4px 8px rgba(0, 0, 0, 0.1);
}
.card-header {
    background-color: #007bff;
    color: white;
}
.btn-primary {
    background-color: #007bff;
    border: none;
}
.btn-primary:hover {
    background-color: #0056b3;
}
6. Preview Your Page with Live Server:
- To see your page in action, right-click on the
index.htmlfile in VS Code and select Open with Live Server. - Your browser will open and show the login page. Any changes you make in the HTML or CSS files will automatically update in the browser.
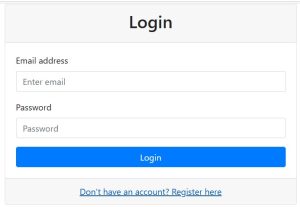
Final Output:
After following the steps, you will have a fully functional and responsive login page with:
- A centered login card.
- Input fields for email and password.
- A login button.
- A footer with a “Register here” link for new users.
By using Bootstrap, creating a responsive and professional-looking login page is a breeze. With the power of Visual Studio Code and Live Server, you can easily build and preview your pages. You can extend this login page by adding JavaScript for form validation or integrate it with a back-end authentication system.