In this tutorial, we’ll walk through building a simple Todo App using HTML, CSS, and JavaScript. This app will allow you to add items to a list and delete them. Follow the steps below to create your own Todo App.
Step 1: Set Up the HTML Structure
First, let’s create the HTML file that will serve as the structure of our Todo App. Create a file named todo.html and add the following code:
<!DOCTYPE html>
<html>
<head>
  <title>Todo App</title>
  <link rel="stylesheet" href="todo.css">
</head>
<body>
  <h1>Todo App</h1>
  <input type="text" id="todo-input" placeholder="Add new todo">
  <button id="add-btn">Add</button>
  <ul id="todo-list"></ul>
  <h2>Made with ❤️ by Pratiyush</h2>
  <script src="todo.js"></script>
</body>
</html>
Explanation:
<!DOCTYPE html>: Declares the document type and version of HTML.<html>: The root element of the HTML document.<head>: Contains meta-information about the document, such as the title and linked CSS file.<title>: Sets the title of the webpage.<link rel="stylesheet" href="todo.css">: Links the external CSS file to style the HTML elements.<body>: Contains the content of the document visible to the user.<h1>: Defines the main heading of the page.<input type="text" id="todo-input" placeholder="Add new todo">: An input field where users can type their todos.<button id="add-btn">Add</button>: A button to add the typed todo to the list.<ul id="todo-list"></ul>: An unordered list that will hold the todo items.<h2>Made with ❤️ by Pratiyush</h2>: A footer message.<script src="todo.js"></script>: Links the external JavaScript file that will add functionality to the app.
Step 2: Style Your App with CSS
Next, we’ll style our Todo App. Create a file named todo.css and add the following code:
  h1{
    display: flex;
    text-align: center;
    justify-content: center;
    font-size: 60px;
    font-family: system-ui, -apple-system, BlinkMacSystemFont, 'Segoe UI', Roboto, Oxygen, Ubuntu, Cantarell, 'Open Sans', 'Helvetica Neue', sans-serif;

  }
  body{
    background-color: #a1ffff;
  }
  #todo-input {
    width: 500px;
    height: 30px;
    font-size: 18px;
    margin-left: auto;
    margin-right: auto;
    display: flex;
    text-align: center;
    justify-content: center;
    border: none;
    border-radius: 10px;
  }

  h2{
    display: flex;
    justify-content: center;
    align-items: center;
    margin-top: 30px;
    font-size: 20px;
    letter-spacing: 2px;
    color: #4e4e4e;
    font-family: system-ui, -apple-system, BlinkMacSystemFont, 'Segoe UI', Roboto, Oxygen, Ubuntu, Cantarell, 'Open Sans', 'Helvetica Neue', sans-serif;
}

  .del-button{
    border-radius: 40%;
    background-color: #001e56;
    color: rgb(255, 255, 87);
    margin-left: 15px;
    border: none;
    height: 30px;
    width: 30px;
    font-size: large;
    font-weight: bold;

  }
  #add-btn {
    width: 100px;
    height: 30px;
    margin-left: auto;
    margin-right: auto;
    margin-top: 20px;
    background-color: #4CAF50;
    border-radius: 10px;
    font-size: large;
    font-weight: bold;
    color: #fff;
    border: none;
    cursor: pointer;
    display: flex;
    text-align: center;
    justify-content: center;
    font-family: system-ui, -apple-system, BlinkMacSystemFont, 'Segoe UI', Roboto, Oxygen, Ubuntu, Cantarell, 'Open Sans', 'Helvetica Neue', sans-serif;
  }

  #todo-list {
    list-style: none;
    padding: 0;
    margin: 0;
    font-size: 27px;
    font-weight: bold;
    font-family: system-ui, -apple-system, BlinkMacSystemFont, 'Segoe UI', Roboto, Oxygen, Ubuntu, Cantarell, 'Open Sans', 'Helvetica Neue', sans-serif;

  }

  .todo-item {
    padding: 10px;
    border-bottom: 1px solid #97b1b6;
  }
Explanation:
h1: Styles the main heading with center alignment, font size, and font family.body: Sets the background color of the page.#todo-input: Styles the input field with width, height, font size, margins, border, and border-radius.h2: Styles the footer message with center alignment, font size, letter spacing, color, and font family..del-button: Styles the delete button with border-radius, background color, text color, margins, border, height, width, font size, and font weight.#add-btn: Styles the add button with width, height, margins, background color, border-radius, font size, font weight, text color, border, cursor, and font family.#todo-list: Styles the unordered list with no list-style, padding, margin, font size, font weight, and font family..todo-item: Styles each todo item with padding and a bottom border.
Step 3: Add Functionality with JavaScript
Now, let’s add the functionality to our Todo App. Create a file named todo.js and add the following code:
const todoInput = document.getElementById('todo-input');
const addBtn = document.getElementById('add-btn');
const todoList = document.getElementById('todo-list');

addBtn.addEventListener('click', addTodo);

function addTodo() {
  const todoText = todoInput.value;
  const todoItem = document.createElement('li');
  todoItem.textContent = todoText;
  todoItem.classList.add('todo-item');
  const deleteBtn = document.createElement('button');
  deleteBtn.classList.add('del-button');
  deleteBtn.textContent = 'X';
  deleteBtn.onclick = () => {
    todoItem.remove();
  };
  todoItem.appendChild(deleteBtn);
  todoList.appendChild(todoItem);
  todoInput.value = '';
}
Explanation:
const todoInput = document.getElementById('todo-input');: Selects the input field element.const addBtn = document.getElementById('add-btn');: Selects the add button element.const todoList = document.getElementById('todo-list');: Selects the unordered list element.addBtn.addEventListener('click', addTodo);: Adds a click event listener to the add button, triggering theaddTodofunction when clicked.function addTodo(): Defines the function that adds a new todo item to the list.const todoText = todoInput.value;: Gets the value (text) from the input field.const todoItem = document.createElement('li');: Creates a new list item element.todoItem.textContent = todoText;: Sets the text content of the list item to the value from the input field.todoItem.classList.add('todo-item');: Adds the classtodo-itemto the list item for styling.const deleteBtn = document.createElement('button');: Creates a new button element for deleting the todo item.deleteBtn.classList.add('del-button');: Adds the classdel-buttonto the delete button for styling.deleteBtn.textContent = 'X';: Sets the text content of the delete button to ‘X’.deleteBtn.onclick = () => { todoItem.remove(); };: Adds an onclick event to the delete button that removes the todo item from the list when clicked.todoItem.appendChild(deleteBtn);: Appends the delete button to the list item.todoList.appendChild(todoItem);: Appends the list item to the unordered list.todoInput.value = '';: Clears the input field after adding the todo item.
Conclusion
Congratulations! You’ve successfully created a simple Todo App using HTML, CSS, and JavaScript. This app allows you to add items to a list and delete them with ease. Feel free to customize the app further and add more features as you like.
Thank you for following along, and happy coding!
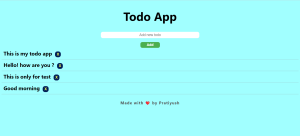
Output