In this tutorial, you’ll learn how to create a Text to QR Code generator using the qrcode.js library. This project will enable you to generate QR codes for any text or URL you input. By the end of this tutorial, you’ll have a fully functional QR code generator that you can use for various applications. Let’s get started!
Step 1: Setting Up the HTML Structure
First, we need to set up our HTML structure. This will include a title, an input box for the text or URL, and a section where the QR code will be displayed.
Create an qr.html file and add the following code:
</html>
<!DOCTYPE html>
<html lang="en">
<head>
    <meta charset="UTF-8">
    <meta name="viewport" content="width=device-width, initial-scale=1.0">
    <title>QRcode Generator</title>
    <link rel="stylesheet" href="./qr.css" />
    <script src="https://cdnjs.cloudflare.com/ajax/libs/qrcodejs/1.0.0/qrcode.min.js"></script>
    <!-- qrcode.js library -->
</head>
<body>
    <div id="box">
        <div>
            <h1>QR Code Generator</h1>
            <div class="qrcode"></div>
            <input type="text" placeholder="Paste a URL or enter text, then press enter" onchange="generateQr()" />
            <h4>Made with ❤️ by Pratiyush</h4>
        </div>
    </div>

    <script src="./qr.js"></script>
</body>
</html>
Here, HTML is Basic and straightforward, you can alter this code according to your needs and get desired output.
Note : Here I have used Onchange event in the input element so that text is converted to QRcode everytime user write something in the input box and hit enter. You can also achieve the same functionality by adding an additional button so, whenever a user write something in input box and then hit that button QR code should be generated then only.
You may have noticed that I have attached one more script tag in the header which is dealing with the qrcode.js library and providing with the required methods.
Step 2: Adding CSS for Styling
Next, we need to add some styles to make our QR code generator look good. Create a file named qr.css and add the following code:
body {
    font-family: system-ui, -apple-system, BlinkMacSystemFont, 'Segoe UI', Roboto, Oxygen, Ubuntu, Cantarell, 'Open Sans', 'Helvetica Neue', sans-serif;
    background-image: linear-gradient(rgb(0, 7, 40), rgb(0, 152, 223));
    margin: 0;
    padding: 0;
    display: flex;
    justify-content: center;
    align-items: center;
    height: 100vh;
}

h1 {
    font-size: 50px;
    margin-bottom: 10px;
    color: #ffdd00;
    display: flex;
    justify-content: center;
    align-items: center;
}
h4 {
    font-size: 20px;
    font-family: system-ui, -apple-system, BlinkMacSystemFont, 'Segoe UI', Roboto, Oxygen, Ubuntu, Cantarell, 'Open Sans', 'Helvetica Neue', sans-serif;
    margin-bottom: 10px;
    color: #ffffff;
    display: flex;
    justify-content: center;
    align-items: center;
    letter-spacing: 2.5px;
}

input[type="text"] {
    width: 100%;
    padding: 10px;
    font-size: 20px;
    border: 4px solid #ffdd00;
    border-radius: 99px;
    outline: none;
    font-family: system-ui, -apple-system, BlinkMacSystemFont, 'Segoe UI', Roboto, Oxygen, Ubuntu, Cantarell, 'Open Sans', 'Helvetica Neue', sans-serif;
}
#box{
    height: 600px;
    width: 600px;
    border: 4px solid #ffffff;
    display: flex;
    border-radius: 99px;
    justify-content: center;
    align-items: center;

}
.qrcode {
    margin: 25px ;
    display: flex;
    justify-content: center;
    align-items: center;

}

input[type="text"]:hover {
    background-color: #fff691;
}

img{
    width: 300px;
    height: 300px;
}
Note: I have used :hover CSS pseudo-class to highlight input box whenever user hover over it, and to center a div or any element I have used display:flex; justify-content: center; aling-items: center; this is the easiest way to center a div or any element.
Step 3: Adding JavaScript for Functionality
Now it’s time to add the functionality that will generate the QR codes. Create a file named qr.js and add the following code:
let qrcode = new QRCode(
    document.querySelector(".qrcode")
);

qrcode.makeCode("Hello my name is Pratiyush and am from codespeedy");

function generateQr() {
    if (
        document.querySelector("input").value === "") {
        alert( "Please write someting in Input box")
    }
    else {
        qrcode.makeCode(document.querySelector("input").value);
    }
}
Step 4: Understanding the JavaScript Code
Let’s break down what the JavaScript code does:
1. Initialize the QRCode object:
let qrcode = new QRCode(document.querySelector(".qrcode"));
This line creates a new QRCode object and attaches it to the .qrcode element in your HTML.
2. Generate a default QR code:
qrcode.makeCode("Hello my name is Pratiyush and am from codespeedy");
This line generates a QR code with the default text “Hello my name is Pratiyush and am from codespeedy”.
3.Function to generate QR code from input:
function generateQr() {
    if (document.querySelector("input").value === "") {
 	   alert("Please write something in the Input box");
    } else {
 	   qrcode.makeCode(document.querySelector("input").value);
    }
}
This function checks if the input box is empty. If it is, an alert is shown. If not, it generates a QR code using the value from the input box.
Step 5: Testing Your QR Code Generator
Now that everything is set up, it’s time to test your QR code generator:
- Open your HTML file: Open qr.html in a web browser and run it with live server. You should see the QR Code Generator interface.
- Generate a QR code: Enter some text or a URL into the input box and press enter. A QR code should be generated and displayed in the .qrcode div.
- Handle empty input: If the input box is empty and you press enter, an alert should prompt you to enter some text.
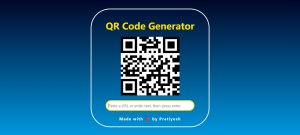
Step 6: Output
Conclusion
Congratulations! You’ve successfully created a Text to QR code generator using the qrcode.js library. This generator can be used for various purposes, such as generating QR codes for URLs, text messages, or any other information you want to share.
Feel free to customize the design and functionality to suit your needs. Happy coding!