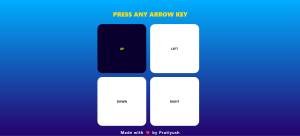
In this tutorial, you will learn how to create a simple web application that detects arrow key presses using HTML, CSS, and JavaScript. Follow these steps to create an interactive page where pressing any arrow key changes the corresponding arrow’s color on the screen.
Step 1: Set Up the HTML File
First, create an HTML file named arrows.html. This file will contain the basic structure of your web page.
<!DOCTYPE html>
<html lang="en">
<head>
    <meta charset="UTF-8">
    <meta name="viewport" content="width=device-width, initial-scale=1.0">
    <title>Arrow Keys</title>
    <link rel="stylesheet" href="arrows.css">
</head>
<body>
    <h1>PRESS ANY ARROW KEY</h1>
    <div class="container">
        <div class="arrow-keys">
            <div class="arrow-key up">UP</div>
            <div class="arrow-key down">DOWN</div>
            <div class="arrow-key left">LEFT</div>
            <div class="arrow-key right">RIGHT</div>
        </div>
    </div>
    <h2>Made with ❤️ by Pratiyush</h2>
    <script src="arrows.js"></script>
</body>
</html>
Explanation
- DOCTYPE Declaration: Defines the document type and HTML version.
- HTML Language Attribute: Sets the language to English.
- Title: Sets the title of the page.
- Link Tag: Links the CSS file for styling.
- Body: Contains the content displayed on the page, including headings and the container for the arrow keys.
- Script Tag: Links the JavaScript file that will handle the key press detection.
Step 2: Add CSS Styling
Create a CSS file named arrows.css. This file will style the web page and make it visually appealing.
body {
    font-family: system-ui, -apple-system, BlinkMacSystemFont, 'Segoe UI', Roboto, Oxygen, Ubuntu, Cantarell, 'Open Sans', 'Helvetica Neue', sans-serif;
    background-color: #f0f0f0;
    font-weight: 700;
    background-image: linear-gradient(rgb(0, 174, 255), rgb(39, 0, 107));
}

.container {
    display: flex;
    justify-content: center;
    align-items: center;
    width: 500px;
    height: 500px;
    margin-left: 500px;
}

.arrow-keys {
    display: grid;
    grid-template-columns: repeat(2, 1fr);
    grid-gap: 20px;
}

.arrow-key {
    display: flex;
    justify-content: center;
    align-items: center;
    width: 250px;
    height: 250px;
    border-radius: 10%;
    background-color: #fff;
    cursor: none;
}
h1{
    display: flex;
    justify-content: center;
    align-items: center;
    margin-top: 50px;
    margin-bottom: 40px;
    color: #ffdd00;
    font-weight: bolder;
    font-family: system-ui, -apple-system, BlinkMacSystemFont, 'Segoe UI', Roboto, Oxygen, Ubuntu, Cantarell, 'Open Sans', 'Helvetica Neue', sans-serif;

}
h2{
    display: flex;
    justify-content: center;
    align-items: center;
    margin-bottom: -3px;
    margin-top: 30px;
    font-size: 20px;
    font-weight: 1000px;
    letter-spacing: 2px;
    color: #f0f0f0;
    font-family: system-ui, -apple-system, BlinkMacSystemFont, 'Segoe UI', Roboto, Oxygen, Ubuntu, Cantarell, 'Open Sans', 'Helvetica Neue', sans-serif;

}

.arrow-key.pressed {
    background-color: #09002d;
    color: #ffea00;
}

.up {
    grid-column: 1;
}

.down {
    grid-column: 1;
    grid-row: 2;
}

.left {
    grid-column: 2;
    grid-row: 1;
}

.right {
    grid-column: 2;
    grid-row: 2;
}
Explanation
- Body Styles: Sets the font, background color, and background gradient.
- Container: Centers the arrow keys container.
- Arrow Keys: Defines a grid layout for the arrow keys.
- Arrow Key: Styles each arrow key element with size, background color, and other properties.
- Headings: Styles for the main and secondary headings.
- Pressed State: Styles for when an arrow key is pressed.
Step 3: Implement JavaScript Functionality
Create a JavaScript file named arrows.js. This file will contain the logic to detect arrow key presses and you can update the UI accordingly.
const arrowKeys = document.querySelectorAll('.arrow-key');

function pressKey(direc) {
    const key = document.querySelector(`.${direc}`);
    key.classList.add('pressed');
}

document.addEventListener('keydown', (e) => {
    switch (e.key) {
        case 'ArrowUp':
            pressKey('up');
            break;
        case 'ArrowDown':
            pressKey('down');
            break;
        case 'ArrowLeft':
            pressKey('left');
            break;
        case 'ArrowRight':
            pressKey('right');
            break;
    }
});

document.addEventListener('keyup', () => {
    arrowKeys.forEach((key) => key.classList.remove('pressed'));
});
Explanation
- Query Selector: Selects all elements with the class
arrow-key. - Press Key Function: Adds the
pressedclass to the corresponding arrow key element. - Keydown Event Listener: Detects when an arrow key is pressed and calls the
pressKeyfunction with the appropriate direction. - Keyup Event Listener: Removes the
pressedclass from all arrow key elements when any key is released.
Step 4: Test Your Program
- Save all three files (
arrows.html,arrows.css,arrows.js) in the same directory. - Open
arrows.htmlin a web browser or live server. - Press the arrow keys on your keyboard and observe how the corresponding arrow on the screen changes its color when pressed.
Conclusion
This tutorial provides a simple yet effective way to detect arrow key presses and visually represent them on a web page. Feel free to customize the styles and functionality as needed. Happy coding!
Output