Hiding the cursor on specific parts of a webpage can create interesting interactions, whether for a game, a unique user interface, or just to surprise users in a specific area of your site. In this post, I’ll show you how to hide the cursor using simple JavaScript, inspired by a popular YouTube tutorial, and apply it to certain div elements on the page.
Approach:
We’ll create two divs: one where the cursor remains visible and another where the cursor will be hidden. When the mouse enters the “hidden” div, we’ll use JavaScript to add a CSS class that hides the cursor. Once the mouse leaves, the cursor will reappear by removing that class.
Here’s the breakdown of the approach:
- HTML: Defines two areas: one where the cursor will remain visible and the other where it will be hidden.
- CSS: Contains styling for the divs and a class to hide the cursor.
- JavaScript: Adds and removes the class for cursor hiding when the user moves the mouse over the hidden area.
1. HTML Code:
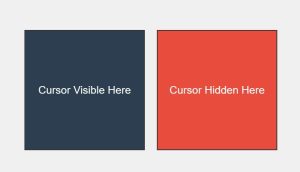
<!DOCTYPE html>
<html lang="en">

<head>
    <meta charset="UTF-8">
    <meta name="viewport" content="width=device-width, initial-scale=1.0">
    <title>Cursor Hide and Show in Specific Areas</title>
    <link rel="stylesheet" href="styles.css">
</head>

<body>
    <div class="container">
        <!-- Visible area where the cursor will be shown -->
        <div id="visible-area" class="area">
            Cursor Visible Here
        </div>
        <!-- Hidden area where the cursor will be hidden -->
        <div id="hidden-area" class="area">
            Cursor Hidden Here
        </div>
    </div>
    <script src="script.js"></script>
</body>

</html>
Explanation:
- We have a simple structure with two
divelements inside a container. - The first
div(#visible-area) is where the cursor will remain visible. - The second
div(#hidden-area) is where the cursor will be hidden.
- We have a simple structure with two
2. CSS Code (styles.css):
/* General body styles */
body {
    font-family: Arial, sans-serif;
    display: flex;
    justify-content: center;
    align-items: center;
    height: 100vh;
    margin: 0;
    background-color: #f0f0f0;
}

/* Container and area styles */
.container {
    display: flex;
    gap: 20px;
}

/* Common styles for both areas */
.area {
    width: 200px;
    height: 200px;
    display: flex;
    justify-content: center;
    align-items: center;
    font-size: 18px;
    border: 2px solid #333;
    transition: background-color 0.3s;
}

/* Specific styles for the visible and hidden areas */
#visible-area {
    background-color: #3498db;
    color: white;
}

#hidden-area {
    background-color: #e74c3c;
    color: white;
}

/* Class to hide the cursor */
.cursor-hidden {
    cursor: none;
}
Explanation:
- The
.areaclass sets the basic appearance of the divs. - We define
#visible-areaand#hidden-areawith different background colors for easy distinction. - The
.cursor-hiddenclass is the key here; it hides the cursor usingcursor: none;
// Get references to the two areas
const visibleArea = document.getElementById('visible-area');
const hiddenArea = document.getElementById('hidden-area');

// Add 'cursor-hidden' class when the mouse enters the hidden area
hiddenArea.addEventListener('mouseenter', () => {
    hiddenArea.classList.add('cursor-hidden');
});

// Remove 'cursor-hidden' class when the mouse leaves the hidden area
hiddenArea.addEventListener('mouseleave', () => {
    hiddenArea.classList.remove('cursor-hidden');
});

// Optional: Change background color when mouse enters/leaves for both areas
[visibleArea, hiddenArea].forEach(area => {
    area.addEventListener('mouseenter', () => {
        area.style.backgroundColor = '#2c3e50';
    });
    area.addEventListener('mouseleave', () => {
        area.style.backgroundColor = '';
    });
});
Explanation:
- We get references to both the
visible-areaandhidden-areaelements usinggetElementById(). - Using
addEventListener(), we track when the mouse enters (mouseenter) and leaves (mouseleave) thehidden-areadiv.- When the mouse enters the hidden area, we add the
cursor-hiddenclass, which hides the cursor. - When the mouse leaves the hidden area, we remove the
cursor-hiddenclass, restoring the cursor’s visibility.
- When the mouse enters the hidden area, we add the
- As an optional enhancement, we change the background color when hovering over either area to make the interaction more dynamic.