If any wants to make a interactive weather website, we have to first use OpenWeatherMap api, you can simply show real time weather data on your website with use of html, css and js. The working and builiding of this process is there in this tutorial.
Building an Live Weather Website
You will need an OpenWeatherMap Api key in order to proceed. Steps are:
1. Register with OpenWeatherMap:
2. Check out the website. Click the sign up button to register and then login to create or generate api key.
3. In order to use this created api key in your project use it in your application and then assemble the project files.
-> index.html
Html file provides basic structure of webpage with placeholders for city name, temperature, humidity and condition.
<!DOCTYPE html>
<html lang="en">
<head>
    <meta charset="UTF-8">
    <meta name="viewport" content="width=device-width, initial-scale=1.0">
    <title>Live Weather Data</title>
    <link rel="stylesheet" href="style.css">
</head>
<body>
    <div class="weather-container">
        <h1>Weather in <span id="city">..</span></h1>
        <p><strong>Temperature:</strong><span id="temperature">..</span>°C</p>
        <p><strong>Humidity:</strong><span id="humidity">..</span>%</p>
        <p><strong>Condition:</strong><span id="condition">..</span></p>
        <p class="error" id="error"></p>
    </div>
    <script src="script.js"></script>
</body>
</html>
-> style.css
Css is use to make webpage more attractive by giving style to html elements.
body {
    font-family: 'Gill Sans', 'Gill Sans MT', Calibri, 'Trebuchet MS', sans-serif;
    background-color: blue;
    display: flex;
    flex-direction: column;
    justify-content: center;
    align-items: center;
    height: 100vh;
    margin: 0;
}

.weather-container {
    background: aqua;
    padding: 20px;
    border-radius: 8px;
    box-shadow: 0 0 10px rgba(0, 0, 0, 0.1);
    text-align: center;
    max-width: 300px;
    width: 300px;
}

h1 {
    margin-bottom: 2em;
    margin: 0;
}

p {
    margin: 5px 0;
}

.error {
    color: aqua;
}
-> script.js
The javascript file modifies html elements by retrieving weather data from the OpenWeatherMap Api. If the city cannot be located, it also handles issues by showing an error message.
async function fetchWeatherData(city) {
    const apiKey = 'c029542dac2901bc68ab9b0197c5a148';
    const url = `https://api.openweathermap.org/data/2.5/weather?q=${city}&units=metric&appid=${apiKey}`;

    try {
        const response = await fetch(url);
        if (!response.ok) throw new Error('City not found');
        const data = await response.json();

            document.getElementById('city').textContent = data.name;
            document.getElementById('temperature').textContent = data.main.temp;
            document.getElementById('humidity').textContent = data.main.humidity;
            document.getElementById('condition').textContent = data.weather[0].description;
            document.getElementById('error').textContent = '';
        } catch (error) {
            document.getElementById('error').textContent = error.message;
        }
}

fetchWeatherData('New York');
Output :
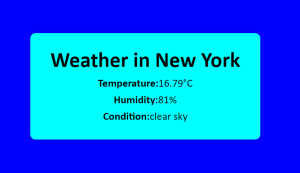
Conclusion :
We can see the live weather data for the default city of New York. We can further enhance it by adding a form to use different cities and to fetch their live weather forecast.