Learn how to manipulate DOM with JavaScript, including class manipulation, CSS styling, element creation, and event handling.
To manipulate DOM with JavaScript, use these following methods
1.Class Attribute
To manipulate DOM elements, use the following methods to add, remove, or toggle classes. These methods are useful for styling or applying animations to elements.
- classList.add(): To Add a class to an element.
- classList.remove(): To Removes a class from an element.
- classList.toggle(): To Toggles a class (adds it if it’s not present, removes it if it is.
<html>
<head>
    <style>
        .highlight {
            color: blue;
            font-weight: bold;
        }
        .bold {
            font-weight: bold;
        }
    </style>
</head>
<body>
    <div id="example" class="bold">   To Manipulate the Class Attribute </div>
    <br>

    <button onclick="addClass()">Add highlight</button>
    <button onclick="removeClass()">Remove bold</button>
    <button onclick="toggleClass()">Toggle highlight </button>
    <script>
        function addClass() {
            document.getElementById("example").classList.add("highlight");
        }
        function removeClass() {
            document.getElementById("example").classList.remove("bold");
        }
        function toggleClass() {
            document.getElementById("example").classList.toggle("highlight");
        }
    </script>
</body>
</html>
Output
- When you click the “Add highlight” button, it adds the
highlightclass to thedivelement with theid="example". This action changes the text color to blue and makes it bold. - If you click the “Remove bold” button, it removes the
boldclass from thediv, which eliminates the bold styling. - When you click the “Toggle highlight” button, it either adds or removes the
highlightclass, depending on whether it is already present.
2.Set CSS Styles Using JavaScript
You can manipulate the CSS styles of an element dynamically using the style property. This allows you to change the appearance of elements directly.
document.getElementById("demo").style.color = "red";
document.getElementById("demo").style.fontSize = "20px";
document.getElementById("demo").style.cssText = "color: blue; font-size: 18px;";
3.Create, Add, and Remove Elements
You can create new elements, add them to the DOM, or remove existing ones using these methods
- document.createElement(): To Create a new element.
- appendChild(): To Add a new element to a parent element.
- removeChild(): To Remove a child element from a parent.
let newDiv = document.createElement("div");
newDiv.textContent = "To Add a new element to a parent element";

document.body.appendChild(newDiv);

document.body.removeChild(newDiv);
4.Using addEventListener()
The addEventListener method is widely used to attach event listeners to elements. This approach lets you add multiple events to a single element and gives you better control over event handling.
<!DOCTYPE html>
<html>

<head>
    <style>
        body {
            display: flex;
            flex-direction: column;
            align-items: center;
            justify-content: center;

        }

        div {
            margin-bottom: 20px;
            font-size: 18px;
            color: #333;
        }

        button {
            padding: 10px 20px;
            font-size: 16px;
            color: white;
            background-color: #007BFF;
            border: none;
            border-radius: 5px;
            cursor: pointer;
        }

        button:hover {
            background-color: #0056b3;
        }
    </style>
</head>

<body>
    <div>DOM Elements with JavaScript</div>
    <button id="myButton">Click Here</button>
    <script>
        document.getElementById('myButton')
            .addEventListener('click', function () {
                alert('Button clicked!');
            });
    </script>
</body>

</html>
Output
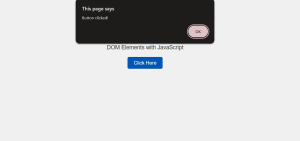
-
The page initially contains a
divelement displaying the text “DOM Elements with JavaScript” at the top. Below thisdiv, there is a button labeled “Click Here.” -
When you click the “Click Here” button, it triggers a JavaScript event listener attached to the button element.
-
Specifically, the
addEventListenermethod listens for theclickevent on the button. -
As a result, upon clicking the button, the event listener calls a function that executes an action.
-
This function then displays an alert box with the message “Button clicked!”
-
Thus, the alert will appear in the center of the screen, notifying the user that the button was clicked.