If you’re building a React app, chances are you’ll need to send data to a server at some point—whether it’s for submitting a form, saving user preferences, or uploading a file. That’s where POST requests come into play!
In this guide, we’ll walk you through everything you need to know about sending POST requests in ReactJS. From the basics to best practices, we’ll make it easy for you to get started.
What is a POST Request?
A POST request is used to send data to a server, often to create or update something. Unlike GET requests, which just fetch data, POST requests send data in the request body—making them perfect for tasks like submitting forms or uploading files.
Key Features of POST Requests:
- The data stays hidden from the URL, offering better security.
- Commonly used for sending sensitive information.
- Works great for APIs when creating or updating resources.
Why Do POST Requests Matter in ReactJS?
React is a popular choice for building interactive and dynamic user interfaces. To make your app functional, you often need to communicate with a backend server or an API. POST requests allow you to:
- Submit data entered by users (e.g., login forms).
- Save configurations or settings.
- Send large or sensitive data securely.
Setting Things Up
Before diving into the code, here’s what you’ll need:
- A React project (e.g., created with
create-react-app). - A basic understanding of React components and state.
- An API endpoint to test your POST requests.
Sending POST Requests Using Fetch API
import React, { useState } from "react";

const PostRequestWithFetch = () => {
  const [formData, setFormData] = useState({ name: "", email: "" });

  const handleInputChange = (e) => {
    const { name, value } = e.target;
    setFormData({ ...formData, [name]: value });
  };

  const handleSubmit = async (e) => {
    e.preventDefault();
    try {
      const response = await fetch("https://jsonplaceholder.typicode.com/posts", {
        method: "POST",
        headers: {
          "Content-Type": "application/json",
        },
        body: JSON.stringify(formData),
      });
      const result = await response.json();
      console.log("Response from server:", result);
      alert("Data sent successfully!");
    } catch (error) {
      console.error("Error:", error);
      alert("Something went wrong!");
    }
  };

  return (
    <form onSubmit={handleSubmit}>
      <label>
        Name:
        <input
          type="text"
          name="name"
          value={formData.name}
          onChange={handleInputChange}
          required
        />
      </label>
      <br />
      <label>
        Email:
        <input
          type="email"
          name="email"
          value={formData.email}
          onChange={handleInputChange}
          required
        />
      </label>
      <br />
      <button type="submit">Send</button>
    </form>
  );
};

export default PostRequestWithFetch;
What’s Happening in the Code?
- State for form data: We use React’s
useStateto keep track of the user’s input. - Fetch API: Sends a POST request to
https://jsonplaceholder.typicode.com/posts. This is a free testing API that works for demos. - Error handling: If something goes wrong, it logs the error and shows an alert.
Sending POST Requests Using Axios
import React, { useState } from "react";
import axios from "axios";

const PostRequestWithAxios = () => {
  const [formData, setFormData] = useState({ name: "", email: "" });

  const handleInputChange = (e) => {
    const { name, value } = e.target;
    setFormData({ ...formData, [name]: value });
  };

  const handleSubmit = async (e) => {
    e.preventDefault();
    try {
      const response = await axios.post("https://jsonplaceholder.typicode.com/posts", formData);
      console.log("Response from server:", response.data);
      alert("Data sent successfully!");
    } catch (error) {
      console.error("Error:", error);
      alert("Something went wrong!");
    }
  };

  return (
    <form onSubmit={handleSubmit}>
      <label>
        Name:
        <input
          type="text"
          name="name"
          value={formData.name}
          onChange={handleInputChange}
          required
        />
      </label>
      <br />
      <label>
        Email:
        <input
          type="email"
          name="email"
          value={formData.email}
          onChange={handleInputChange}
          required
        />
      </label>
      <br />
      <button type="submit">Send</button>
    </form>
  );
};

export default PostRequestWithAxios;
Which One Should You Use: Fetch or Axios?
- Use Fetch if you want a lightweight, native solution.
- Use Axios if you prefer simplicity and additional features like interceptors and request cancellation.
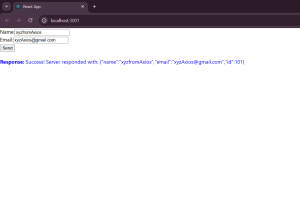
Output
Using Fetch
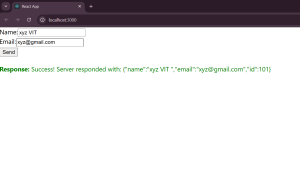
Using Axios