Basic Home Automation by Voice Control using Arduino Uno
 Sridhar Vempati
Aug 06, 2020
Sridhar Vempati
Aug 06, 2020
Build your own Voice-controlled smart home using "Basic Home Automation by Voice Control" project which uses Arduino Uno board, Arduino IDE Software, Relay module, Bluetooth Module, Breadboard.
In this project we will build "Basic Home Automation by Voice Control" using these items: 1x Arduino Uno, 1x Relay Module, 1x HC-05 Bluetooth module, 2x bulbs and 2x bulb holders.
Components Required:
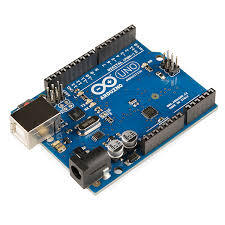
1) 1x Arduino Uno R3 Development Board
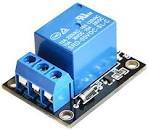
2) 1x 5v-2channel Relay Module
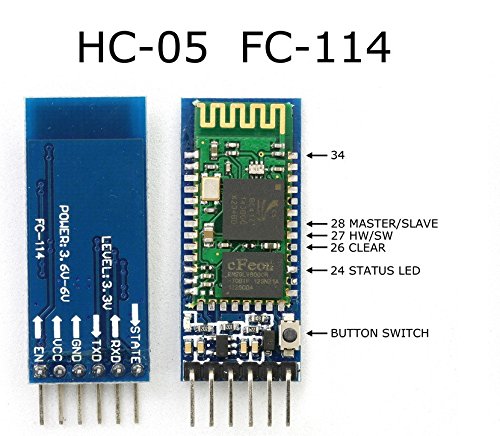
3) 1x HC-05 Bluetooth module
4) 2x LEDs
5) Jumper Cables
6) 1x Breadboard
Software(s)/Applications used:
1) Arduino IDE
2) AMR Voice Apk
->Download Arduino IDE software onto your computer from https://www.arduino.cc/en/main/software
->Download AMR Voice Apk onto your mobile phone which helps us give voice commands through Bluetooth. Connect your mobile Bluetooth to the HC-05 module after giving connections to Arduino Uno as given below.
Libraries Used:
"No Libraries Required"
Connections to be given:
Connect Arduino Uno board to the computer using a USB cable. Connect GND, 5V pins of Bluetooth module to GND, 5V pins of Arduino Uno board respectively using a Breadboard. Connect RX pin of Bluetooth module to TX pin of Arduino Uno board and TX pin of Bluetooth module to RX pin of Arduino Uno board. Now connect GND, VCC pins of Relay to GND, VCC pins of Arduino Uno Board respectively. Now connect the positive terminals of both led(s) to pins 1,2 of 5v-2channel Relay module respectively and negative terminals to the common ground using a breadboard.
Home-Automation:
Home automation is making your home a smart home which is by controlling all home electrical and electronic appliances by using a mobile phone application or by using voice recognition. Some of home automation projects include Amazon Echo Dot, Google Home etc.
Arduino UNO:
Here in this project, we use the Arduino UNO R3 module which is the basic development board which Arduino.cc has released. It is an open-source microcontroller development board which is based on microchip ATMega328p microprocessor and developed by Arduino.cc.
This development contains sets of I/O pins in which 14 are digital pins and 6 are analogue pins. Out of 14 digital pins 6 are capable of PWM output. This board can be powered by using either a USB or an external 9-volt battery.
We can program it using the Arduino IDE(Integrated Development Environment). We can use this board and build a lot of IoT projects viz Home-Automation, Fire Alert System and a lot more projects based on your ideas.
Relay Module:
A Relay is an electromagnetic switch which can be controlled without any human intervention. It can be controlled by single or multiple control signals. There are several channel relays. Here in this project, we use 5v-2channel relay which requires 5v as an input signal for ON/OFF as there are only two light bulbs and if for more electrical and electronic appliances you can use some more channel relay.
Bluetooth Module:
A Bluetooth Module is a hardware component which provides a wireless connection between computer or mobile phone to an electrical component like Arduino Uno. HC-05 Bluetooth module uses serial communication. It is a slave Bluetooth module designed for wireless serial communication, meaning that it can receive serial data when serial data is sent out from a master Bluetooth device(device able to send serial data through the air: mobile phones, PC). There are a lot of Bluetooth modules in which we use the HC-05 Module for our Home Automation project.
Our project(code) Starts Here:
String voice;
#define relay1 2 //Connect relay1 to pin 2
#define relay2 3 //Connect relay2 to pin 3
void setup()
{
    Serial.begin(9600); //Set rate for communicating with phone
    pinMode(relay1, OUTPUT); //Set relay1 as an output
    pinMode(relay2, OUTPUT); //Set relay2 as an output
    digitalWrite(relay1, LOW); //Switch relay1 off
    digitalWrite(relay2, LOW); //Swtich relay2 off
}
void loop()
{
    while(Serial.available()) //Check if there are available bytes to read
    {
        delay(10); //Delay to make it stable
        char c = Serial.read(); //Conduct a serial read
        if (c == '#'){
        break; //Stop the loop once # is detected after a word
        }
        voice += c; //Means voice = voice + c

    }

    if (voice.length() >0)
    {
    Serial.println(voice);
    if(voice == "*switch on"){
    switchon();
    } //Initiate function switchon if voice is switch on
    else if(voice == "*switch off"){
    switchoff();
    } //Initiate function switchoff if voice is switch off
    else if(voice == "*light on"){
    //You can replace 'light on' with anything you want...same applies to others
    digitalWrite(relay1, HIGH);
    }
    else if(voice == "*light off"){
    digitalWrite(relay1, LOW);
    }
    else if(voice == "*fan open"){
    digitalWrite(relay2, HIGH);
    }
    else if(voice == "*fan close"){
    digitalWrite(relay2, LOW);
    }
    voice="";
    }

}

void switchon() //Function for turning on relays
{
    digitalWrite(relay1, HIGH);
    digitalWrite(relay2, HIGH);
}

void switchoff() //Function for turning on relays
{
    digitalWrite(relay1, LOW);

    digitalWrite(relay2, LOW);
}
Let's break the code:-
1) First, declare the pins 2 & 3 for relays 1 and 2 and string voice
String voice;
#define relay1 2 //Connect relay1 to pin 2
#define relay2 3 //Connect relay2 to pin 3
2) Next, set up the pins for output and input and setting the baud rate for serial communication.
void setup()
{
    Serial.begin(9600); //Set rate for communicating with phone
    pinMode(relay1, OUTPUT); //Set relay1 as an output
    pinMode(relay2, OUTPUT); //Set relay2 as an output
    digitalWrite(relay1, LOW); //Switch relay1 off
    digitalWrite(relay2, LOW); //Swtich relay2 off
}
3)Next void loop(), our main code runs here. Basing on our pre-set voice commands viz. "switch on", "switch off", "lights on", "lights off".
void loop()
{
    while(Serial.available()) //Check if there are available bytes to read
    {
        delay(10); //Delay to make it stable
        char c = Serial.read(); //Conduct a serial read
        if (c == '#'){
        break; //Stop the loop once # is detected after a word
        }
        voice += c; //Means voice = voice + c

    }

    if (voice.length() >0)
    {
    Serial.println(voice);
    if(voice == "*switch on"){
    switchon();
    } //Initiate function switchon if voice is switch on
    else if(voice == "*switch off"){
    switchoff();
    } //Initiate function switchoff if voice is switch off
    else if(voice == "*light on"){
    //You can replace 'light on' with anything you want...same applies to others
    digitalWrite(relay1, HIGH);
    }
    else if(voice == "*light off"){
    digitalWrite(relay1, LOW);
    }
    else if(voice == "*fan open"){
    digitalWrite(relay2, HIGH);
    }
    else if(voice == "*fan close"){
    digitalWrite(relay2, LOW);
    }
    voice="";
    }

}
4) Last, declare already used switchon() and switchoff() functions.
void switchon() //Function for turning on relays
{
    digitalWrite(relay1, HIGH);
    digitalWrite(relay2, HIGH);
}

void switchoff() //Function for turning on relays
{
    digitalWrite(relay1, LOW);

    digitalWrite(relay2, LOW);
}
--Thank You--
Project Files
| .. | ||
| This directory is empty. | ||
